دليل موديول الكاميرا الحرارية: اختيار مستشعر الأشعة تحت الحمراء غير المبرد المناسب لمشاريع الأعمال اليدوية والطائرات بدون طيار ولينكس
٢. ٤ يونيو ٢٠٢٦
دليل وحدة الكاميرا الحرارية بالأشعة تحت الحمراء: اختيار نواة LWIR غير المبردة المناسبة للطائرات بدون طيار وراسبيري باي والمشاريع الذاتية
5 يونيو 2026
دليل وحدة كاميرا التصوير الحراري: اختيار نواة LWIR المناسبة للطائرات بدون طيار، والأعمال اليدوية، والبث المباشر في الوقت الفعلي
انظر، لقد تحول اختيار وحدة كاميرا تصوير حراري إلى واحدة من أكثر عمليات الشراء إرباكًا في الهندسة المضمنة الحديثة. يفيض السوق بادعاءات متضاربة — مستشعرات رخيصة من فئة MLX تعد بـ "رؤية حرارية" تمنحك شبكة بكسلات ضبابية بحجم 32×24، مقابل أنظمة بيئية مقفلة من DJI تكلف آلاف الدولارات وتمنحك مرونة صفرية في العتاد. سواء كنت تبني حمولة طائرة بدون طيار، أو منظارًا حراريًا يدوي الصنع، أو منصة بث مباشر في الوقت الفعلي لـ Raspberry Pi، أو محطة فحص لنقاط PCB الساخنة، فإن دقة النواة الخاطئة، أو البعد البؤري للعدسة، أو واجهة الإخراج ستدمر مشروعك بالكامل قبل أن يُعرض الإطار الأول.
إليك الخلاصة: هذا الدليل يخترق الضوضاء. نحلل بالتفصيل كيف تعمل تقنية الميكروبولومتر LWIR (الأشعة تحت الحمراء طويلة الموجة) غير المبردة، ولماذا أصبحت دقة 640×512 النقطة المثالية للتطبيقات الجادة، وكيفية مطابقة البعد البؤري (5 مم إلى 150 مم) مع مدى الكشف، وكيفية تحقيق بث سلس ومنخفض الكمون عبر USB/UVC على المنصات المضمنة. بحلول وقت انتهائك من القراءة، ستكون قادرًا على تحديد مواصفات وحدة كاميرا تصوير حراري بدقة هندسية — مطابقة دقة المستشعر، والعدسة، ومعدل الإطارات، والواجهة مع مهمة الطائرة بدون طيار، أو الفحص، أو القياس الخاصة بك. لنبنِها بالشكل الصحيح.
جدول المحتويات
- 👉 ما هي وحدة كاميرا التصوير الحراري؟
- 👉 كيف تعمل تقنية الميكروبولومتر LWIR غير المبردة
- 👉 فك شيفرة الدقة: 384×288 مقابل 640×512 مقابل 640×480
- 👉 اختيار العدسة والبعد البؤري (5 مم–150 مم)
- 👉 واجهات الإخراج والبث في الوقت الفعلي
- 👉 تعمق في التطبيقات: الطائرات بدون طيار، المناظير اليدوية الصنع، فحص PCB
- 👉 منتج مميز: نواة LWIR مصغرة بدقة 640×512 (جدول المواصفات)
- 👉 قائمة مراجعة التكامل للمهندسين
- 👉 أسئلة متكررة
ما هي وحدة كاميرا التصوير الحراري؟
وحدة كاميرا التصوير الحراري هي نظام فرعي تصويري قائم بذاته — مستشعر، وASIC/ISP، وعدسة، وواجهة إخراج مجمعة معًا — يحول الأشعة تحت الحمراء غير المرئية إلى صورة حرارية مرئية. الجزء المهم: إنها مصممة لتُدمج في جهاز مضيف أكبر، لا لتوضع على مكتبك ككاميرا مستقلة. هذا هو المحرك الذي يشغل كل شيء من حمولات الطائرات بدون طيار التجارية إلى أدوات الفحص المحمولة.
يجب أن تفصل في ذهنك بين الوحدة والكاميرا الكاملة. الوحدة هي المحرك "الأساسي": لا شاشة، لا بطارية، لا هيكل متين. هذه الطبيعة المجردة هي بالضبط ما يمنح المهندسين والمبتكرين حرية بناء حمولات مخصصة — تركيب النواة داخل جسم منظار مطبوع بتقنية ثلاثية الأبعاد، أو محور توجيه كاميرا طائرة بدون طيار، أو منصة فحص على طاولة العمل. أنت توفر المنصة المضيفة؛ الوحدة توفر الرؤية الحرارية.
تعمل معظم الوحدات الجادة في نطاق LWIR، منطقة 8–14 ميكرومتر من الطيف الكهرومغناطيسي. هذا النطاق مثالي لاكتشاف الأجسام ذات درجة حرارة الغرفة — الأشخاص، الآلات العاملة، الإلكترونيات النشطة — لأن هذه الأهداف تشع بقوة أكبر في الأشعة تحت الحمراء طويلة الموجة. نطاقا MWIR و SWIR، بالمقابل، يناسبان الأعمال الصناعية أو العلمية المتخصصة لكنهما يتطلبان عتادًا أكثر تكلفة ومبردًا في الغالب. هناك أيضًا انقسام أساسي بين التصاميم المبردة وغير المبردة، وهو ما سنتطرق إليه في القسم التالي.
تشريح الوحدة: المكونات الأساسية الأربعة
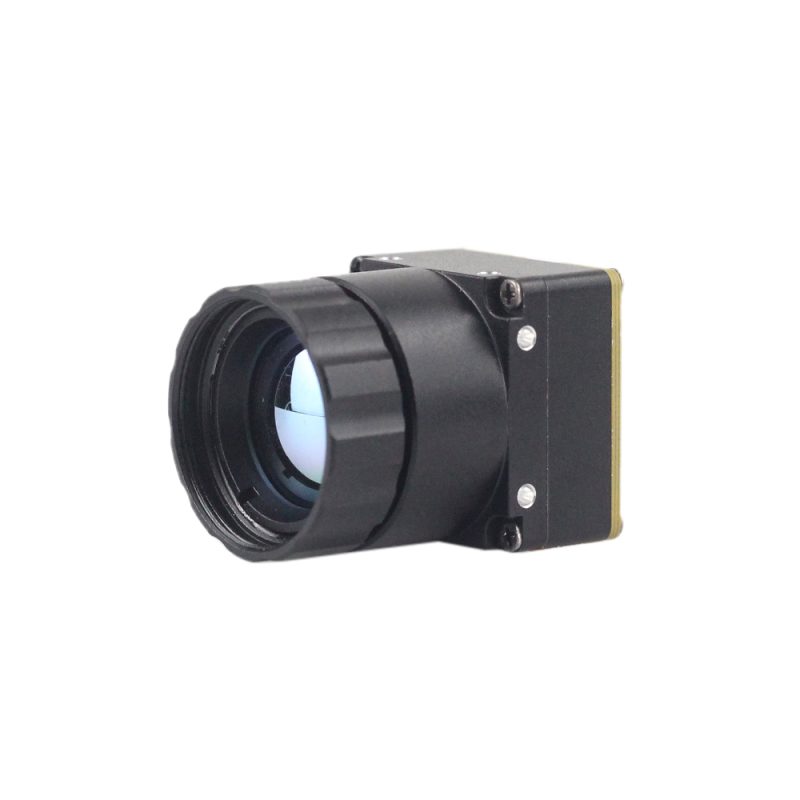
كل وحدة كاميرا تصوير حراري قادرة تُبنى من أربع كتل وظيفية. إليك ما يوجد تحت الغطاء:
- ⚙️ مصفوفة المستوى البؤري للميكروبولومتر (FPA) — شبكة البكسلات الحساسة للحرارة التي تقوم بالكشف الفعلي.
- ⚙️ معالج إشارة الصورة / دائرة القراءة المتكاملة (ROIC) — يقرأ المصفوفة ويطبق التصحيحات التي تحول البيانات الخام إلى صورة واضحة.
- ⚙️ البصريات — عدسة من الجرمانيوم أو الكالكوجينيد تركز طاقة الأشعة تحت الحمراء طويلة الموجة (LWIR) على المصفوفة البؤرية المستوية (FPA).
- ⚙️ واجهة الإخراج — USB/UVC أو MIPI أو تناظرية أو LVDS، لتوصيل الإطارات إلى جهازك المضيف.
إذا كنت تزن خيارات الدقة للمستوى المبتدئ، فإن تحليلنا لـ وحدة المواصفات الذهبية MD-Series بدقة 384×288 هو نقطة انطلاق عملية.
كيف تعمل تقنية الميكروبولومتر LWIR غير المبردة
الفيزياء الأساسية أنيقة في الواقع. كل جسم فوق الصفر المطلق يصدر إشعاعًا تحت أحمر يتناسب مع درجة حرارته. داخل الوحدة، تحزم مصفوفة الميكروبولومتر آلاف البكسلات المجهرية المصممة لامتصاص فوتونات LWIR. عندما تصطدم طاقة الأشعة تحت الحمراء ببكسل، يسخن ذلك البكسل قليلاً، مما يغير مقاومته الكهربائية. تقيس دائرة القراءة المتكاملة (ROIC) هذا التغير في المقاومة إطارًا تلو الآخر عبر المصفوفة بأكملها، لترسم خريطة للتباينات الطفيفة في درجات الحرارة إلى صورة حرارية متماسكة. لا حاجة للضوء المرئي—هذه الوحدات ترى في الظلام الدامس، وعبر الدخان، وفي ظل الظروف البيئية القاسية.
كلمة "غير مبردة" هي الاختراق التجاري الحقيقي هنا. تحتاج المستشعرات الحرارية المبردة القديمة إلى مبرد شديد البرودة لتبريد الكاشف إلى درجات حرارة قصوى، مما يزيد من الحجم والوزن واستهلاك الطاقة والتكلفة ويضيف مكونًا ميكانيكيًا عرضة للأعطال. تعمل الميكروبولومترات غير المبردة في درجة حرارة الغرفة، مما يعني حجمًا أصغر، واستهلاك طاقة أقل بكثير، وتكلفة أقل، وتشغيلًا شبه فوري، ومتوسط وقت أطول بكثير بين الأعطال (MTBF). بالنسبة للطائرات بدون طيار التي تعاني من قيود الوزن وميزانية البطارية—وللبناة الهواة الذين يعانون من قيود محافظهم—فإن التقنية غير المبردة هي الخيار المنطقي الوحيد.
تباعد البكسل والحساسية (شرح NETD)
هناك مواصفتان تحددان مدى جودة الصورة الحرارية حقًا. الأولى هي NETD (فرق درجة الحرارة المكافئ للضوضاء), ، والتي تخبرك بأصغر فرق في درجة الحرارة يمكن للمستشعر استخلاصه بشكل موثوق من الضوضاء. الأقل هو الأفضل؛ يمكن لوحدة مصنفة بأقل من 50 ملي كلفن تمييز التدرجات الحرارية الدقيقة—الدفء الخافت لمقاوم يسخن بشكل هامشي أو حرارة جسم شخص مقابل خلفية باردة. المستشعرات ذات NETD العالي تطمس هذه الفروق إلى ضوضاء.
الثانية هي تباعد البكسل, ، وهو المسافة الفيزيائية بين البكسلات، عادة 12 ميكرومتر أو 17 ميكرومتر. تباعد 12 ميكرومتر الأصغر يحزم بكسلات أكثر في رقاقة أصغر، مما يمنحك صورًا أكثر وضوحًا وبصمة وحدة أكثر اكتنازًا—وهو بالضبط ما تتطلبه حوامل تثبيت الطائرات بدون طيار الضيقة. يحدد التباعد والدقة معًا مقدار التفاصيل الحقيقية التي تصل فعليًا إلى شاشتك.
دور معالج إشارة الصورة (ISP) وتصحيح عدم الانتظام (NUC)
خرج الميكروبولومتر الخام ليس منتظمًا تمامًا أبدًا—تستجيب البكسلات الفردية بشكل مختلف قليلاً. يعالج معالج إشارة الصورة (ISP) المدمج هذا بـ تصحيح عدم الانتظام (NUC), ، غالبًا باستخدام مصراع ميكانيكي لالتقاط مرجع مسطح وإعادة معايرة المصفوفة. وفوق ذلك يوجد التحكم التلقائي في الكسب (AGC), ، الذي يحسن التباين عبر النطاق الحراري المرئي، بالإضافة إلى تحسين التفاصيل الرقمية الذي يزيد من حدة الحواف. تنتج هذه العمليات معًا "عرض الصورة الحاد والواضح" الذي تروج له وحدة Mini 640. ولا تخدع نفسك—فموثوقية التوصيلات الفيزيائية من لوحة إلى لوحة ووصلات USB التي تحمل تلك الإشارة المعالجة مهمة للغاية في التكامل المضمن؛ موصلات من شركات مثل موليكس تضع معيار المتانة الذي يجب أن تبحث عنه في بيئات الطائرات بدون طيار الغنية بالاهتزازات.
فك شيفرة الدقة: 384×288 مقابل 640×512 مقابل 640×480
الدقة ليست مقياسًا للتفاخر—إنها تحدد بشكل مباشر قدرة الكشف. المزيد من البكسلات على الهدف يعني مدى كشف أطول وتفاصيل حرارية أدق. هذه العلاقة موصوفة رسميًا في معيار DRI (الكشف، التمييز، التعريف), ، الذي يوضح عدد البكسلات التي يجب أن تسقط على الهدف قبل أن تتمكن من مجرد كشفه، وتمييز ماهيته، وأخيرًا تعريفه بشكل محدد. كل بكسل تضيفه يدفع تلك العتبات الثلاثة إلى مدى أبعد.
384×288 — نقطة الدخول الفعالة من حيث التكلفة
وحدة 384×288 هي الاختيار الذكي للتصاميم منخفضة الطاقة، صغيرة الحجم، والمراعية للميزانية، ومهام المراقبة قصيرة المدى. إنها توفر تصويرًا حراريًا حقيقيًا دون عبء التكلفة أو النطاق الترددي للدقات الأعلى، مما يجعلها مثالية للأجهزة المحمولة المدمجة والفحص للمبتدئين. للحصول على ملخص كامل للمواصفات، راجع بحثنا المتعمق حول وحدة MD-Series 384×288 الفعالة من حيث التكلفة.
640×512 / 640×480 — المعيار الاحترافي
الانتقال إلى دقة فئة 640 يمنحك ما يقرب من 3.3× بكسل أكثر من مستشعر 384—قفزة تحويلية لأعمال الطائرات بدون طيار والتفتيش الجادة. كثافة البكسل الإضافية تمد نطاق الكشف، وتزيد من حدة التفاصيل الدقيقة، وتمنحك مساحة للتقريب الرقمي والاستدلال بالذكاء الاصطناعي. الفرق الدقيق بين 640×512 و640×480 يعود إلى متغير FPA ونسبة العرض إلى الارتفاع الناتجة؛ توفر وحدة Mini كلا الخيارين بسهولة لتتمكن من مطابقة شاشتك أو خط أنابيب المعالجة. دليلنا Mini 640 فائق الصغر للغوص العميق يغطي هذا بتفاصيل دقيقة.
| الدقة | إجمالي البكسلات | الاستخدام النموذجي | التكلفة النسبية |
|---|---|---|---|
| 384×288 | ~110,000 | الميزانية، قصيرة المدى، محمولة باليد | $ |
| 640×480 | ~307,000 | التفتيش الاحترافي، البث | $$ |
| 640×512 | ~327,000 | حمولات الطائرات بدون طيار، طويلة المدى | $$ |
إذا كنت تزن بنشاط بين Mini 384 وMini 640 لبنائك التالي، فإن دليلنا دليل الوحدات الحرارية لعام 2025 للتكامل السريع ومنخفض التكلفة يعرض المفاضلات جنبًا إلى جنب للمهندسين.
اختيار العدسة والبعد البؤري (5مم إلى 150مم)
بمجرد تحديد الدقة، يصبح اختيار العدسة أكبر عامل مؤثر على الأداء في العالم الحقيقي. المبدأ الأساسي هو مقايضة عكسية: البعد البؤري يحكم العلاقة بين مجال الرؤية (FOV) ونطاق الكشف. البعد البؤري القصير يمنحك مجال رؤية واسع مع تفاصيل قريبة المدى، بينما البعد البؤري الطويل يضيق مجال الرؤية لكنه يركز البكسلات على الأهداف البعيدة لزيادة مسافة الكشف بشكل كبير.
الأبعاد البؤرية القصيرة (5مم–18مم): تطبيقات مجال الرؤية الواسع
تتألق العدسات القصيرة حيث تحتاج لرؤية مشهد واسع عن قرب. تفتيش لوحات الدوائر المطبوعة، والتصوير الحراري قريب المدى، والمسح اليدوي، والأمن الداخلي كلها تستفيد من مجال الرؤية الواسع الذي توفره بصريات 5مم إلى 18مم. على لوحة دوائر كثيفة، يحافظ البعد البؤري القصير على التجميع بأكمله في الإطار بينما تحدد شبكة 640 بكسل المكونات الساخنة الفردية.
الأبعاد البؤرية المتوسطة (25مم–50مم): حمولات الطائرات بدون طيار المتوازنة
نطاق 25مم إلى 50مم هو حصان العمل لرسم خرائط الطائرات بدون طيار للأغراض العامة وأمن المحيط. إنه يوازن بين نطاق الكشف القابل للاستخدام ومجال رؤية واسع بما يكفي لتغطية الأرض بكفاءة أثناء الطيران، مما يجعله التوصية الافتراضية للمشغلين الذين يحتاجون إلى تنوع بدلاً من التخصص.
الأبعاد البؤرية الطويلة (75مم–150مم): الكشف طويل المدى
عندما تكون المهمة هي مراقبة الطائرات بدون طيار على ارتفاعات عالية، أو مراقبة الأصول عن بعد، أو البحث والإنقاذ، فإن الأبعاد البؤرية الطويلة من 75مم إلى 150مم تثبت جدارتها. من خلال حزم المزيد من البكسلات على الأهداف البعيدة، فإنها تزيد نطاقات DRI إلى أقصى حد بحيث يمكن اكتشاف الشخص أو المركبة والتعرف عليها من مسافة آمنة.
مادة العدسة لا تقل أهمية عن البعد البؤري—ربما أكثر. البصريات الجرمانيوم عالية الجودة مع طلاء مضاد للانعكاس (AR) والتعويض الحراري تحافظ على استقرار الصورة عبر تقلبات درجات الحرارة. البصريات الرخيصة تقلل من النقل الحراري، وتلين الصورة، وتفقد التركيز مع تسخين أو تبريد البيئة—مقوضةً المستشعر الذي دفعت مالًا جيدًا مقابله.
لأن مطابقة العدسة تعتمد على التطبيق، يسعد فريقنا الهندسي أن يوصي بطول بؤري محدد لحمولتك ومتطلبات الكشف لديك—فقط تواصل عبر روابط الاستشارة في هذا الدليل.
واجهات الإخراج والبث في الوقت الفعلي على المنصات المدمجة
واجهة الإخراج تحدد مدى سهولة تواصل وحدتك مع المضيف. لديك أربعة خيارات شائعة على الطاولة:
- ⚙️ USB/UVC — الموصل العالمي للتطوير الحديث؛ التوصيل والتشغيل بدون تعريفات.
- ⚙️ MIPI CSI-2 — نطاق ترددي عالٍ، لكنه يتطلب تكاملًا على مستوى اللوحة ودعمًا من جانب النواة.
- ⚙️ CVBS التناظري — بسيط للغاية، لكنه مقتصر على الشاشات القديمة.
- ⚙️ LVDS — رائع للوحات الخلفية الصناعية، غير ملائم للهواة.
يفوز USB/UVC بشكل حاسم في التكامل الذاتي والسريع لأنه يعمل بالتوصيل والتشغيل وبدون تعريفات على كل من Linux وWindows. لا حاجة لتعديل النواة، ولا تجميع مخصص للتعريفات—تظهر الوحدة ببساطة كجهاز فيديو قياسي، تمامًا مثل كاميرا الويب. بالنسبة للنماذج الأولية والمنتجات ذات الدفعات الصغيرة، يقلص ذلك وقت التطوير من أسابيع إلى ساعات.
البث إلى Raspberry Pi و ESP32
للحصول على فيديو مباشر سلس، يكون معدل الإطارات المستقر والثابت من 25 إلى 30 هرتز أكثر أهمية من الدقة الظاهرية. يجب أن تحافظ الوحدة على هذا المعدل ضمن النطاق الترددي المتاح لـ USB مع الحفاظ على زمن انتقال منخفض بما يكفي للتراكبات في الوقت الفعلي. هنا بالضبط تفشل مستشعرات I²C الرخيصة من فئة MLX: فهي تتواصل عبر ناقل بطيء بدقة صغيرة ومعدلات تحديث منخفضة، منتجةً مخرجات متقطعة ومتكتلة عديمة الفائدة للفيديو. يتجنب مخرج UVC المستقر لـ Mini 640 كل ذلك، موفرًا إطارات حرارية كاملة الدقة وخالية من زمن الانتقال فور تشغيلها.
مجموعة البرامج وسلاسل الأدوات
على الجانب البرمجي، تندمج وحدة UVC مباشرة في سلسلة الأدوات الرئيسية:
- ✅ OpenCV للرؤية الحاسوبية.
- ✅ V4L2 للالتقاط الأصلي على Linux.
- ✅ خطوط أنابيب Python للبرمجة السريعة.
- ✅ جي ستريمر للبث والتحويل الترميزي القوي.
يؤدي إقران الوحدة بلوحة حاملة مدعومة جيدًا إلى تسريع عملية البناء أكثر—النظام البيئي لـ Raspberry Pi HAT والأجهزة الطرفية المدمجة من Waveshare هو أساس شائع لمشاريع التصوير الحراري التي تحتاج إلى دخل/خرج إضافي، أو إدارة طاقة، أو مخرج عرض.
ميزانية الطاقة والحرارة للبنى المدمجة
احسب دائمًا الجهد وسحب التيار قبل الانتهاء من البناء. الحواسيب أحادية اللوحة مثل Raspberry Pi والمتحكمات الدقيقة مثل ESP32 لديها ميزانيات طاقة USB محدودة، ويؤدي الناقل ضعيف التغذية إلى انخفاضات في الجهد، أو إطارات مسقطة، أو فشل في التشغيل. عندما تشغل وحدة حرارية إلى جانب أجهزة طرفية أخرى، يكون موزع USB عالي الجودة مزودًا بطاقة تأمينًا رخيصًا ضد الأعطال المتقطعة. للحصول على سير عمل التكامل الكامل من البداية إلى النهاية، راجع دليل التكامل السريع منخفض التكلفة لعام 2025.
التعمق في التطبيقات: الطائرات بدون طيار، والنطاقات اليدوية، وفحص لوحات الدوائر المطبوعة
حمولات التصوير الحراري للطائرات بدون طيار (مقارنة بـ DJI، مبنية حسب الطلب)
للعمل الجوي، كل غرام ومليمتر له أهميته. قلب وحدة Mini 640 بأبعاد 21مم×21مم صغير وخفيف بما يكفي ليندمج بسلاسة في الحوامل المحورية المدمجة والحوامل المطبوعة ثلاثية الأبعاد المخصصة، تاركاً مساحة لإلكترونيات تراكب القياس عن بعد. تشمل المهام الواقعية الزراعة (رسم خرائط إجهاد المحاصيل)، وفحص الألواح الشمسية (اكتشاف الخلايا التالفة من ارتفاع)، والبحث والإنقاذ، ومراقبة خطوط الطاقة. العامل الحاسم هو التكلفة: تقدم هذه الوحدة مخرجات حرارية مقارنة بـ DJI بجزء بسيط من سعر حمولة احتكارية مقفلة - مع إبقائك متحكماً بالكامل في العتاد.
النطاقات الحرارية اليدوية والأجهزة المحمولة
للصيادين والمراقبين والمصنعين، يشغل نفس القلب النطاقات الحرارية اليدوية مع تراكبات الشبكة والتشغيل بالبطارية. هذا يدحض مباشرة خرافة "الرخيص يعني الرديء" المستمرة: ميكروبولومتر حقيقي غير مبرد من فئة 640 مع تصحيح عدم انتظام (NUC) وتحكم تلقائي بالكسب (AGC) مناسبين ينتج صوراً نظيفة وقابلة للاستخدام تصمد أمام النطاقات التجارية الأغلى بكثير، مع ميزة حرية التخصيص الكاملة.
الفحص الحراري للوحات الدوائر المطبوعة والإلكترونيات
إقران طول بؤري قصير مع دقة 640 يحول الوحدة إلى أداة تشخيص دقيقة. على اللوحات المكتظة بالمكونات، تحدد كثافة البكسل هذه النقاط الساخنة الفردية - وهي قدرة حاسمة لتحديد الملامح الحرارية في البحث والتطوير، وتحليل الأعطال، والتحقق من إعادة الصهر. يمكن للمهندسين تحديد مكون يسخن بشكل هامشي قبل أن يتسبب في عطل ميداني بوقت طويل.
المراقبة الأمنية والاستطلاع والرصد الصناعي
للتركيبات الثابتة، تدعم قدرة الوحدة القوية على التكيف البيئي والأداء المستقر التشغيل على مدار الساعة وفي جميع الأحوال الجوية. تكتشف الرؤية الحرارية المتسللين في الظلام الدامس وتنبه إلى ارتفاع حرارة الآلات الصناعية قبل حدوث الأعطال. للمزيد عن هذه السيناريوهات، راجع مقالتنا المخصصة فحص Mini 640 الصناعي والأمني.
منتج مميز: وحدة كاميرا تصوير حراري Mini 640×512 غير مبردة LWIR
بجمع كل شيء معاً، وحدة Mini 640×512 غير المبردة LWIR هي قلبنا الموصى به للطائرات بدون طيار، والنطاقات اليدوية، والبث المضمن في الوقت الفعلي. تقدم عرض صورة حاد وواضح، وحجماً مضغوطاً، وتكلفة منخفضة - وهو مزيج نادر في هذا المجال. البصمة فائقة الصغر 21مم×21مم، والدقة الاختيارية 640×480، ومجموعة العدسات الكاملة 5/9/13/18/35/50/75/100/150مم، والأداء المستقر، والقدرة القوية على التكيف البيئي تجعلها قابلة للتكيف مع أي مشروع حراري يمكنك تخيله تقريباً.

| المواصفات | التفاصيل |
|---|---|
| اسم المنتج | وحدة قلب كاميرا تصوير حراري Mini 640×512 USB غير مبردة LWIR للطائرات بدون طيار (مشابهة لـ DJI) |
| نوع المستشعر | مقياس ميكروبولوميتر غير مبرد LWIR |
| الدقة | 640×512 / 640×480 (اختياري) |
| حجم الوحدة | 21مم × 21مم (فائقة الاكتناز) |
| خيارات العدسات | 5 / 9 / 13 / 18 / 35 / 50 / 75 / 100 / 150 مم |
| واجهة الإخراج | USB / UVC (توصيل وتشغيل) |
| جودة الصورة | عرض حاد وواضح مع تصحيح عدم انتظام (NUC) وتحكم تلقائي بالكسب (AGC) |
| القدرة على التكيف البيئي | أداء قوي / مستقر |
| تطبيقات مثالية | الطائرات بدون طيار، النطاقات اليدوية، الرؤية المضمنة، فحص لوحات الدوائر المطبوعة، الأمن |
| الموقع من حيث التكلفة | مخرجات مقارنة بـ DJI، بجزء بسيط من التكلفة |
إذا كان مشروعك مقيداً بالميزانية بشكل صارم وقصير المدى، فإن Mini 384 هو بديل جدير يستبدل عدد البكسلات بتكلفة واستهلاك طاقة أقل - قارن بينهما في منشور مواصفات MD-Series 384×288 قبل أن تلتزم.
قائمة مراجعة التكامل للمهندسين
قبل تقديم الطلب، راجع قائمة التحقق الهندسية هذه للتأكد من أن الوحدة تناسب نظامك من البداية إلى النهاية:
- ⚙️ هدف الدقة — أكده مقابل متطلبات الكشف والتعرف والتمييز (DRI) لمهمتك الأطول مدى.
- ⚙️ البعد البؤري — اختره عن طريق مطابقة مجال الرؤية لأقرب وأبعد أهداف اهتمامك.
- ⚙️ واجهة الإخراج — تحقق من أن منصتك المضيفة تدعمها؛ بالنسبة لمعظم عمليات البناء السريع، يعني ذلك تأكيد توافق UVC على جهاز Linux أو Windows الخاص بك.
- ⚙️ الطاقة وعرض النطاق الترددي — احسب إجمالي سحب التيار عبر جميع ملحقات USB وأضف موزعًا مزودًا بالطاقة إذا تجاوزت حدود لوحتك.
- ⚙️ التثبيت الميكانيكي — خطط حول البصمة 21مم×21مم، مع ترك مساحة خالية لبرميل العدسة وتخفيف إجهاد الكابل.
- ⚙️ خط أنابيب البرمجيات — اصنع نموذجًا أوليًا مبكرًا؛ قم بتشغيل OpenCV أو GStreamer لالتقاط الفيديو قبل الانتهاء من الهيكل حتى تتمكن من اكتشاف مشكلات معدل الإطارات أو زمن الوصول بينما لا تزال التغييرات رخيصة.
اتبع هذا التسلسل وستتجنب أكثر إخفاقات التكامل شيوعًا وستصل إلى أول إطار عمل أسرع بكثير.
فيديو توضيحي لنواة التصوير الحراري المصغرة 640×512
الأسئلة الشائعة: وحدات كاميرا التصوير الحراري
س1: ما هي أفضل وحدة كاميرا حرارية للبث عالي الدقة في الوقت الفعلي إلى Raspberry Pi أو ESP32؟
س2: هل يمكنني استخدام وحدة كاميرا حرارية صينية لبناء مناظير DIY أو طائرات بدون طيار دون التضحية بجودة الصورة؟
س3: ما هي دقة المستشعر الحراري والعدسة التي يجب أن أختارها لتطبيقي (فحص لوحات الدوائر المطبوعة، أو الطائرات بدون طيار، أو القياس)؟
عند إحكام إغلاق نواة حرارية غير مبردة داخل علبة مقاومة للطقس IP67/IP68، يكون التصميم الحراري السلبي حاسمًا لإيقاف الانحراف الحراري الأساسي وتدهور الصورة. لا تحتاج الميكروبولومترات إلى مبردات نشطة، لكن ASIC الصورة المدمجة ومشفرات الفيديو الشبكية تستهلك بين 1.0 واط و 2.5 واط أثناء التشغيل. في صندوق محكم ضيق بدون تدفق هواء، تخلق الحرارة الداخلية المحتبسة نقاطًا ساخنة عبر هيكل النواة ومصفوفة المستوى البؤري. تؤدي هذه التدرجات الحرارية الموضعية إلى خلل في قراءات درجة الحرارة الإشعاعية وتزيد من ضوضاء المستشعر، مما يقلل من حساسية NETD الفعالة لديك. لحل هذا، صمم مسارات مباشرة لتبديد الحرارة المعدنية—مثل كتلة باردة من الألومنيوم أو النحاس مقترنة بوسادات فجوة عالية التوصيل—تربط اللوحة الحرارية للوحدة مباشرة بالغلاف المعدني الخارجي. هذا يحول كامل الهيكل الخارجي إلى مشتت حراري كبير. أيضًا، تجنب تركيب أجزاء عالية الطاقة (مثل أجهزة الراديو RF أو محولات الطاقة الساخنة) بجوار النواة البصرية مباشرة للحفاظ على استقرار الظروف الحرارية عبر المستشعر.
- المعيار الصناعي (النظام البيئي المضمن): Waveshare — لوحات HAT ولوحات الحامل لـ Raspberry Pi
- المعيار الصناعي (موثوقية الموصلات): Molex — موصلات من لوحة إلى لوحة وموصلات USB
- دليل ذو صلة: دليل الوحدات الحرارية لعام 2025: تكامل سريع منخفض التكلفة للمهندسين
- دليل ذو صلة: وحدة LWIR مصغرة غير مبردة بدقة 640: تصوير حراري فائق الصغر بدقة 640×512
- دليل ذو صلة: المواصفات الذهبية للتصوير الحراري من سلسلة MD بدقة 384×288