640x512 Moduł kamery termowizyjnej: Kompletny przewodnik po integracji z dronami i AI brzegową
20 lipca 2026
Najlepsze moduły kamer termowizyjnych UVC dla Linux, Pi i systemów wbudowanych
21 lipca 2026 r.
Przewodnik po module kamery termowizyjnej MIPI: Integracja wysokorozdzielczego Edge AI z Raspberry Pi i dronami
Spójrzmy prawdzie w oczy: sprawienie, by wysokowydajne obrazowanie w podczerwieni współpracowało z wbudowanymi systemami obliczeniowymi, od zawsze było ogromnym utrapieniem dla architektów systemów. Dawniej byliśmy skazani na prowadzenie wolnych linii SPI o niskiej przepustowości, użeranie się z nieporęcznymi, zastrzeżonymi interfejsami równoległymi lub przepalanie budżetów energetycznych prądożernymi, masywnymi konfiguracjami USB. Ale czasy się zmieniły. Pojawienie się MIPI CSI-2 (Mobile Industry Processor Interface Camera Serial Interface 2) standardu w dziedzinie niechłodzonych kamer LWIR (długa podczerwień) całkowicie zmieniło reguły gry, niwelując ogromny podział fizyczny i architektoniczny.
Przesyłając surowe, wysokorozdzielcze klatki termiczne bezpośrednio do procesora sygnału obrazu (ISP) lub GPU procesora głównego – całkowicie omijając typowe wąskie gardła USB i SPI – moduły termiczne z obsługą MIPI odblokowały uczenie maszynowe w czasie rzeczywistym z ultraniskimi opóźnieniami na brzegu sieci. Mówimy tu o uruchamianiu zaawansowanych modeli wykrywania obiektów na lekkim, mobilnym sprzęcie, takim jak Raspberry Pi 4/5 i NVIDIA Jetson Orin Nano, bez najmniejszego wysiłku.
Ten przewodnik integracyjny to Twój podręcznik terenowy. Niezależnie od tego, czy budujesz ładunki do dronów, konfigurujesz autonomiczne roboty fabryczne, czy projektujesz inteligentne centra monitorowania, ten dokument szczegółowo omawia układ sprzętowy na poziomie miedzi, konfiguracje sterowników i potoki oprogramowania potrzebne do połączenia wysokorozdzielczego modułu kamery termowizyjnej MIPI z nowoczesnymi procesorami głównymi. Przyjrzymy się również pod lupą niektórym rzeczywistym, komercyjnym modułom opartym na układach ASIC, abyś mógł zobaczyć, jak te koncepcje przekładają się na fizyczny sprzęt stworzony do pracy w trudnych warunkach.
Spis treści
- 👉 MIPI CSI-2 a starsze interfejsy termiczne: Decydująca analiza architektoniczna
- 👉 Wnętrze sprzętu: Przetwarzanie ASIC i ścieżka sygnałowa niechłodzonego mikrobolometru LWIR
- 👉 Integracja wbudowana: Konfiguracja sterownika, drzewa urządzeń i potoku V4L2 krok po kroku
- 👉 Prezentacje produktów przemysłowych: Porównanie specyfikacji technicznych
- 👉 Archetypy wdrożeń Edge AI i systemów lotniczych
- 👉 Pogłębione FAQ dla deweloperów (Rozwiązywanie problemów technicznych)
MIPI CSI-2 a starsze interfejsy termiczne: Decydująca analiza architektoniczna
Aby zrozumieć, dlaczego bezpośrednie łącze termiczne MIPI CSI-2 jest jedynym rozsądnym wyborem dla wysokowydajnego uczenia maszynowego na brzegu sieci, przyjrzyjmy się, co dzieje się pod maską w porównaniu ze starszymi magistralami, takimi jak SPI, USB czy interfejsy równoległe (DVP).
Film demonstracyjny miniaturowego rdzenia termowizyjnego 640×512
Oto sedno sprawy ze starszym sprzętem: w przypadku USB lub SPI surowe klatki termiczne muszą pokonać długą, okrężną drogę. Dane są przepychane przez pośredni kontroler USB lub układ mostkowy, wędrują kablem i trafiają na stos oprogramowania systemu operacyjnego hosta. Oznacza to, że CPU jest nieustannie przerywane, aby przetwarzać pakiety USB, zmuszając systemy do akceptowania ogromnych kar za opóźnienia, wysokiego obciążenia CPU i grubszych wiązek przewodów fizycznych.
Bezpośrednia konfiguracja MIPI podłączona do magistrali zmienia to wszystko. Łączy ona rdzeń niechłodzonego czujnika termicznego bezpośrednio z wbudowanym, niestandardowym układem ASIC. Stamtąd dane płyną dedykowanym, ekranowanym przed zakłóceniami kablem taśmowym MIPI CSI-2 prosto do fizycznego portu wejścia wideo układu Host System on Chip (SoC). Dzięki sprzętowemu DMA (bezpośredniemu dostępowi do pamięci) te przychodzące surowe 14-bitowe (Y14) macierze wideo są zrzucane bezpośrednio do pamięci systemowej, bez pytania głównych rdzeni CPU o pozwolenie. Rezultat? Fizyczne opóźnienie poniżej milisekundy.
Wysoka przepustowość i minimalne opóźnienia
Protokół MIPI CSI-2 działa w oparciu o warstwę fizyczną MIPI D-PHY warstwa fizyczna, wykorzystująca szybkie pary sygnałów różnicowych składające się z jednej dedykowanej linii zegara i maksymalnie czterech linii danych. Nawet podstawowa, jednoliniowa konfiguracja D-PHY v1.1 zapewnia solidne 1,5 Gb/s surowej przepustowości fizycznej.
Porównaj to z SPI, które osiąga ścianę w okolicach 50 MHz (efektywnie 50 Mb/s). Jasne, SPI poradzi sobie z małą, niskorozdzielczą termiczną zabawką 160 x 120 działającą przy powolnych 9 Hz. Jeśli jednak pracujesz nad profesjonalnym sensorem o rozdzielczości 640 x 512, generującym 30 klatek na sekundę przy pełnej 14-bitowej głębi radiometrycznej, masz do czynienia z poważną matematyką:
Szybkość transmisji danych = 640 × 512 × 30 klatek/s × 14 bitów/piksel ≈ 137,6 Mb/s
Nie da się tego przepchnąć przez magistralę SPI bez poważnego tłumienia sygnału, przesunięcia zegara i błędów synchronizacji. A próba przesłania tej surowej matrycy przez USB 2.0 opakowuje pakiety wideo w złożone ramki protokołu, podbijając użycie CPU do poziomów krytycznych. MIPI CSI-2 zachowuje prostotę, kierując surowe piksele bezpośrednio, pozbywając się balastu protokołu i redukując opóźnienie od szkła do pamięci niemal do zera.
| Parametr / Metryka | Magistrala SPI | USB 2.0 / USB-C | Równoległe DVP | MIPI CSI-2 |
|---|---|---|---|---|
| Maks. praktyczna przepustowość | ~50 Mb/s | ~480 Mb/s | ~800 Mb/s | Do 6,0 Gb/s (4 linie) |
| Obciążenie CPU protokołem | Ekstremalne (Bit-banging/Przerwania) | Wysokie (Demon USB i sterowniki) | Średnie (Wysoka liczba przełączeń pinów) | Bardzo niskie (Bezpośredni sprzętowy DMA) |
| Opóźnienie (szkło-GPU) | > 120 ms | 45 ms – 90 ms | 15 ms – 35 ms | < 5 ms |
| Fizyczna liczba pinów | 4 - 5 pinów | 4 piny (VCC, GND, D+, D-) | 12 - 20 pinów | 6 - 10 pinów (Ultraniskie EMI) |
| Maks. odległość transmisji | < 15 cm | Do 3 metrów | < 10 cm (Wysoka czułość) | Do 30 cm (Elastyczna płytka PCB) |
| Synchronizacja wielu kamer | Niezwykle trudne | Niedokładna (synchronizacja programowa) | Umiarkowane | Precyzyjne wyzwalanie sprzętowe |
W krytycznych, rzeczywistych zastosowaniach, takich jak unikanie kolizji w autonomicznych bezzałogowych statkach powietrznych (UAV), surowa prędkość akwizycji może dosłownie decydować o powodzeniu misji lub całkowitej katastrofie. W przypadku użycia interfejsu MIPI, układ SoC otrzymuje status niechłodzonego czujnika mikrobolometrycznego klatka po klatce z zerowym opóźnieniem, zapewniając algorytmom oprogramowania szybkość potrzebną do wykrywania przeszkód i natychmiastowej korekty kursu.
Wnętrze sprzętu: Przetwarzanie ASIC i ścieżka sygnałowa niechłodzonego mikrobolometru LWIR
Zdejmijmy metalową osłonę i spójrzmy na krzem. Wysokiej klasy modułu kamery termowizyjnej MIPI konfiguracja to precyzyjny instrument elektrooptyczny. Jego zadaniem jest przechwytywanie długofalowego promieniowania podczerwonego (w zakresie od 8 μm do 14 μm) i przekształcanie tych fotonów w czyste, zserializowane pakiety cyfrowe gotowe dla procesora głównego.
Najpierw światło podczerwone przechodzi przez profesjonalną soczewkę germanową (Ge), na przykład stałoogniskową 9 mm. Ponieważ zwykłe szkło blokuje promieniowanie LWIR, german jest tutaj materiałem z wyboru. Soczewka skupia tę energię cieplną na matrycy płaszczyzny ogniskowej (FPA) wypełnionej niechłodzonymi mikrobolometrami z tlenku wanadu (VOx) lub diod krzemowych.
Każdy piksel w tej matrycy to mikroskopijna struktura mostkowa zawieszona nad krzemem. Gdy foton podczerwieni uderza w ten mostek, temperatura membrany zmienia się, zmieniając jej opór elektryczny. Układ scalony odczytu (ROIC) połączony bezpośrednio pod matrycą mikrobolometrów skanuje te zmiany, przykłada prądy polaryzacji i przekształca te sygnały analogowe w surowe cyfrowe wartości o wysokiej rozdzielczości za pomocą wbudowanych przetworników analogowo-cyfrowych (zazwyczaj generujących 14-bitowe lub 16-bitowe wartości surowe).
Kluczowa rola wbudowanego układu ASIC
Próba przesłania surowych danych z mikrobolometru bezpośrednio do procesora głównego bez ich wcześniejszego oczyszczenia spowodowałaby przeciążenie procesora. Surowe dane z mikrobolometru są niezwykle zaszumione: pełne przestrzennych niejednorodności, martwych pikseli i szumu termicznego. Dlatego wysokiej klasy termiczne rdzenie MIPI wykorzystują wbudowany układ scalony specyficznego przeznaczenia (ASIC) do obsługi najbardziej wymagających zadań, zanim piksele trafią na linie MIPI.
Oto podstawowe etapy przetwarzania sprzętowego, które układ ASIC wykonuje w czasie rzeczywistym:
⚙️ Korekcja niejednorodności (NUC): Ten etap kompensuje dryft między pikselami. Z czasem wewnętrzne ciepło kamery powoduje, że piksele raportują różne wartości. Układ ASIC stosuje macierze wzmocnienia i offsetu w czasie rzeczywistym, tymczasowo uruchamiając wewnętrzną fizyczną przesłonę w celu ustalenia linii bazowej punktu zerowego.
⚙️ Zastępowanie uszkodzonych pikseli (BPR): Gdy piksel mikrobolometru ulegnie uszkodzeniu lub się zatnie, układ ASIC interpoluje dane z otaczających pikseli, aby zamaskować to w locie.
⚙️ Filtrowanie przestrzenne i czasowe: Wykorzystuje to algorytmy trójwymiarowej adaptacyjnej redukcji szumów, aby obniżyć różnicę temperatur równoważną szumom (NETD) urządzenia, dzięki czemu obraz jest ostry nawet w scenach, gdzie wszystko ma mniej więcej tę samą temperaturę.
⚙️ Automatyczna regulacja wzmocnienia (AGC) i kompresja zakresu dynamicznego (DRC): Aby uzyskać obraz czytelny dla człowieka, nie można po prostu wyświetlić surowego strumienia 14-bitowego. Układ ASIC kompresuje ten ogromny zakres dynamiczny do wysokokontrastowego wyjścia 8-bitowego (przy użyciu algorytmów kontrastu przestrzennego, takich jak CLAHE).
⚙️ Wstawianie metadanych telemetrycznych i radiometrycznych: Układ ASIC osadza obliczone wartości temperatury bezpośrednio w liniach wygaszania każdego pakietu wideo. Pozwala to kodowi na odpytywanie dokładnego oszacowania temperatury dowolnego pojedynczego piksela bez konieczności analizowania całkowicie oddzielnego strumienia danych.
Po przetworzeniu układ ASIC pakuje te dane w czyste ramki MIPI (często w formatach 14-bit raw, UYVY lub RGB). Fizyczne nadajniki D-PHY serializują te dane i przesyłają je przez szybkie różnicowe linie transmisyjne. Tymczasem polecenia konfiguracyjne, poprawki rejestrów i komendy wędrują tam i z powrotem przez interfejs sterowania kamerą (CCI) — który w rzeczywistości jest po prostu standardową linią zegara I2C w trybie szybkim, pracującą z częstotliwością do 400 kHz.
Integracja wbudowana: Konfiguracja sterownika, drzewa urządzeń i potoku V4L2 krok po kroku
Jeśli pracujesz w warsztacie nad podłączeniem jednego z tych modułów do płytki wbudowanej, takiej jak BCM2711/BCM2712 (znajdującej się w Raspberry Pi 4/5) lub NVIDIA Jetson, musisz upewnić się, że wyprowadzenia sprzętowe, drzewo urządzeń i warstwy V4L2 są ze sobą zgodne.
Mapowanie wyprowadzeń fizycznych
W większości konfiguracji rdzeń czujnika łączy się z hostem za pomocą cienkiego, 15- lub 22-pinowego elastycznego kabla taśmowego (FPC). Upewnij się, że dokładnie odwzorowujesz te linie na swojej płytce:
⚙️ VCC (linie zasilające): Zwykle wymaga oddzielnych linii zasilania rdzenia 3,3 V, 1,8 V, a czasami 1,2 V.
⚙️ GND: Kluczowe jest owinięcie wysokoczęstotliwościowych mas ekranujących wokół różnicowych linii zegara i danych, aby całkowicie wyeliminować przesłuchy.
⚙️ MCLK (zegar główny): Sygnał $24\text{ MHz} - 27\text{ MHz}$ dostarczany przez hosta do napędzania wewnętrznej maszyny stanów układu ASIC.
⚙️ I2C SDA / SCL (CCI): Steruje odczytami i zapisami rejestrów.
⚙️ MIPI CLKP / CLKN: Różnicowa para linii zegara.
⚙️ MIPI D0P/N i D1P/N: Dwie linie różnicowych par danych do transmisji.
⚙️ PWDN / RESET: Standardowe piny GPIO do twardego wyłączania zasilania i resetowania układu ASIC.
Integracja drzewa urządzeń (plik źródłowy DTSI)
Aby poinformować jądro Linuksa, że na fizycznym porcie CSI nasłuchuje rdzeń kamery, musisz napisać i skompilować nakładkę drzewa urządzeń (.dtbo). Oto przetestowany plik drzewa urządzeń, który możesz dostosować, aby zarejestrować rdzeń termiczny sterowany przez ASIC pod adresem I2C 0x30:
/dts-v1/;Weryfikacja podsystemu V4L2 i sterowanie potokiem
Po skompilowaniu tej nakładki i uruchomieniu systemu standardowe sterowniki Linuksa powinny wykryć kamerę MIPI i zmapować ją bezpośrednio jako urządzenie Video4Linux2. Przeprowadźmy szybkie sprawdzenie w terminalu, aby potwierdzić, że magistrala fizyczna została poprawnie zarejestrowana:
# Zapytanie systemu w celu potwierdzenia dołączenia sterownikaNasz konsola powinna wyświetlić coś takiego, co wskazuje, że odbiornik sprzętowy CSI przeanalizował nakładkę:
Unicam Video Capture (platform:fe801000.csi):
Teraz zapytajmy konkretny węzeł urządzenia, aby zobaczyć, jaką konfigurację danych pikseli wysyła wbudowany układ ASIC przez interfejs MIPI:
# Lista obsługiwanych rozdzielczości i formatów pikseliPowinieneś zobaczyć formaty zarówno dla surowych danych, jak i czystych, przetworzonych strumieni wideo:
ioctl: VIDIOC_ENUM_FMT
Jeśli chcesz przechwycić kilka surowych klatek i zrzucić je bezpośrednio na dysk bez ładowania ciężkich bibliotek dekodujących, uruchom to polecenie testowe w terminalu:
# Przechwytywanie surowych radiometrycznych klatek Y14 bezpośrednio z modułu MIPIOparty na Pythonie silnik przechwytywania w czasie rzeczywistym i konwersji radiometrycznej
Aby wciągnąć ten strumień do rzeczywistego potoku wizji komputerowej, możesz napisać lekkie opakowanie w Pythonie używając OpenCV. Ten kod podłączy strumień klatek, odczyta surowe zliczenia pikseli, przekonwertuje je na rzeczywiste temperatury powierzchni i wyświetli zlokalizowany układ termiczny:
import cv2Prezentacje produktów przemysłowych: Porównanie specyfikacji technicznych
Kiedy pozyskujesz niechłodzone czujniki podczerwieni do rzeczywistego wdrożenia produktu, musisz rozważyć specyfikacje mechaniczne i typy interfejsów w stosunku do limitów rozmiaru, wagi i mocy (SWaP) Twojego ładunku. Przyjrzyjmy się dwóm komercyjnym, ultra-kompaktowym rdzeniom termowizyjnym zaprojektowanym, aby sprostać tym wyzwaniom integracyjnym w terenie.
Prezentacja produktu 1: Mini2 640x512 9mm Moduł kamery termowizyjnej do dronów
Mini2 to ultra-lekki, kompaktowy rdzeń termowizyjny zaprojektowany do montażu na mikro-gimbalach, komercyjnych ramach dronów i ramionach robotycznych o krytycznych ograniczeniach przestrzennych.

Przegląd techniczny:
Niekamerowy moduł kamery termowizyjnej Mini2 640x512 9mm do dronów został zbudowany od podstaw z myślą o ładunkach lotniczych, gdzie masa ma krytyczne znaczenie. Łącząc wysoce czułą, niechłodzoną matrycę mikrobolometryczną VOx z precyzyjnie frezowanym obiektywem 9 mm, moduł ten dostarcza niezwykle ostre obrazy termiczne dalekiego zasięgu. Ponieważ przesyła surowe pomiary radiometryczne i filtrowane klatki bezpośrednio ze swojego pokładowego interfejsu MIPI CSI-2, omijasz nieporęczne, energochłonne konwertery USB. Przekłada się to na dłuższy czas lotu, mniej problemów ze stabilizacją ładunku i czyste metryki śledzenia celu.
Zobacz szczegóły produktu i ceny ➔
Prezentacja produktu 2: Moduł kamery z czujnikiem termicznym ASIC
Moduł ten łączy przemysłowy, niechłodzony rdzeń z wysoce uniwersalną płytą interfejsu, co czyni go idealnym do stałych systemów bezpieczeństwa, monitorowania sieci i systemów ochrony obiektów przemysłowych.
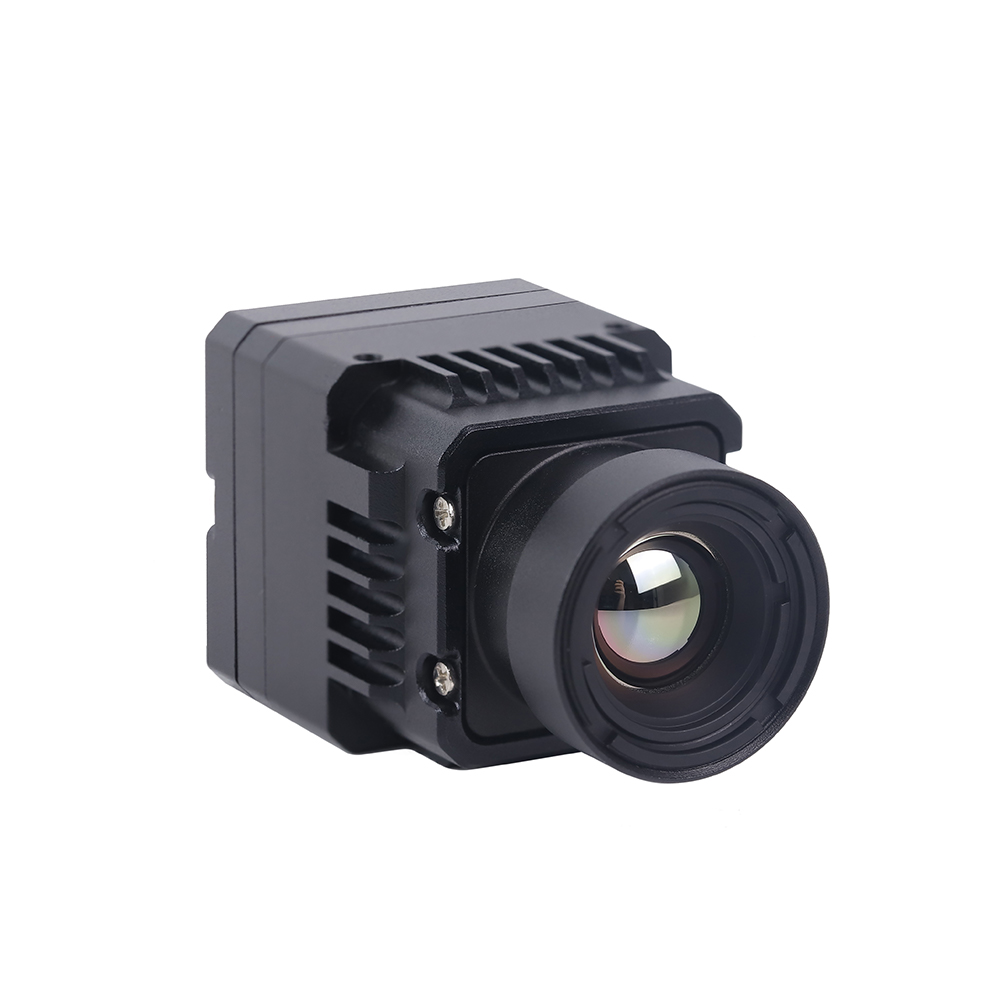
Przegląd techniczny:
Niekamerowy moduł kamery termowizyjnej RJ45 CVBS RTSP IP 640*512 został zbudowany w oparciu o wytrzymały rdzeń przetwarzania ASIC, aby pracować nieprzerwanie w wymagających środowiskach. Moduł ten wyróżnia się tym, że zawiera natywny sprzęt sieciowy. Otrzymujesz możliwości RJ45 do strumieniowania wideo bezpośrednio przez RTSP/RTMP, w połączeniu z analogowymi liniami wideo CVBS do bezpośredniego podłączenia do starszych monitorów bezpieczeństwa. Jeśli budujesz większy przemysłowy system monitorowania lub sieć przeciwpożarową obiektu, ta wieloportowa elastyczność oszczędza konieczności łączenia łańcuchowego zewnętrznych kontrolerów systemowych.
Zobacz szczegóły produktu i ceny ➔
Porównawcza macierz specyfikacji
Porównajmy te dwa rdzenie obok siebie, abyś mógł zobaczyć, jak ich profile sprzętowe pokrywają się z Twoimi celami projektowymi:
| Parametr techniczny | Niekamerowany moduł Mini2 640x512 | Moduł czujnika termicznego ASIC (RJ45/CVBS/RTSP) |
|---|---|---|
| Typ mikrobolometru | Niekamerowana matryca ogniskowa z tlenku wanadu (VOx) | Niekamerowany rdzeń VOx z pokładowym przemysłowym układem ASIC |
| Rozdzielczość pikseli | 640 × 512 (dostępne opcje 384 × 288) | 640 × 512 natywna wysoka rozdzielczość |
| Rozstaw pikseli | 12 μm | 12 μm |
| Zakres spektralny | 8 μm - 14 μm (pasmo LWIR) | 8 μm - 14 μm (pasmo LWIR) |
| Czułość termiczna (NETD) | < 40 mK (przy 25°C, dla f/1.0) | < 50 mK (przy 25°C, dla f/1.0) |
| Optyka domyślna | Stały obiektyw germanowy 9mm | Wiele konfiguracji (9mm, 13mm lub niestandardowe) |
| Szybkość przetwarzania klatek | Wyjście w czasie rzeczywistym 25 Hz / 30 Hz | Konfiguracja wysokiej częstotliwości 30 Hz / 50 Hz |
| Interfejs danych wyjściowych | MIPI CSI-2 (strumienie surowe i wideo) | Ethernet RJ45 (IP/RTSP), analogowe CVBS |
| Sprzętowa kontrola napięcia | Szyny wejściowe 3,3 V - 5,0 V | Szyny regulatora 5,0 V - 12,0 V |
| Profil wagowy | < 18 gramów (ultralekka konstrukcja) | ~ 45 gramów (z wieloportową płytą interfejsu) |
| Główne zastosowania terenowe | Gimbale UAV, systemy robotyczne, mapowanie lotnicze | Stałe systemy bezpieczeństwa, przemysłowe stacje diagnostyczne |
Archetypy wdrożeń Edge AI i systemów lotniczych
Wzięcie surowego, niechłodzonego rdzenia MIPI i umieszczenie go na aktywnej, autonomicznej ramie drona wprowadza wyzwania fizyczne i elektryczne. Aby uniknąć awarii w terenie, należy pamiętać o tych kluczowych czynnikach fizycznych:
Ekranowanie elektromagnetyczne (ochrona EMI)
Drony są naszpikowane hałaśliwą elektroniką. Nowoczesne regulatory prędkości do multikopterów (ESC), linie telemetryczne działające na częstotliwości 915 MHz oraz cyfrowe nadajniki wideo emitują dużo szumów o wysokiej częstotliwości. Standardowe taśmy kamer działają jak anteny, wychwytując te zakłócenia i gubiąc pakiety, co powoduje zawieszanie się obrazu lub fizyczne blokady magistrali.
Aby tego uniknąć, owiń fizyczne linie giętkie taśmami ekranującymi z miedzi lub aluminium i upewnij się, że uziemiłeś ten ekran bezpośrednio do centralnej ramy węglowej drona. To odprowadza szumy z dala od wrażliwych linii szybkiej transmisji, utrzymując czysty sygnał.
Niskoszumowa dystrybucja zasilania
Gdy dron zwiększa przepustnicę, napięcie akumulatora spada lub pojawiają się skoki. Niechłodzone mikrobolometry są bardzo wrażliwe na wahania napięcia wejściowego. Jeśli linia zasilająca jest zaszumiona, na obrazie termowizyjnym pojawią się poziome pasy.
Aby temu zapobiec, użyj dedykowanego, niskoszumowego regulatora liniowego LDO o wysokim współczynniku PSRR (tłumienia tętnień zasilania) do zasilania rdzenia termicznego. To odsprzęga wejścia analogowe sensora od spadków napięcia akumulatora i szumów przełączania silników.
Izolacja od wibracji mechanicznych
Silniki i śmigła UAV generują mikrowibracje o wysokiej częstotliwości. Wibracje te powodują fizyczne zniekształcenia i rozmycie ruchu w obrazach termowizyjnych, a z czasem mogą obciążać fizyczne połączenia giętkich taśm.
Aby to naprawić, zastosuj miękkie elastomerowe kulki tłumiące (o twardości w skali Shore'a od 30A do 40A) na mocowaniach sensora. Izoluje to kamerę i chroni rozdzielczość przestrzenną 12 mikronów przed rozmazaniem podczas szybkich lotów.
Projektowanie potoku wnioskowania AI w czasie rzeczywistym
Użycie bezpośredniego interfejsu MIPI z wydajnym procesorem towarzyszącym (takim jak Jetson Orin Nano) pozwala na uruchamianie nowoczesnych modeli detekcji obiektów, takich jak YOLOv8, w locie. Ten przepływ pracy jest bardzo skuteczny w operacjach poszukiwawczo-ratowniczych, inspekcjach konstrukcji czy zautomatyzowanych patrolach bezpieczeństwa.
Ponieważ MIPI omija nieporęczne warstwy konwersji USB, surowe klatki trafiają do pamięci z niemal zerowym opóźnieniem. Poniżej znajduje się gotowy do integracji wrapper Pythona wykorzystujący silnik wykonawczy TensorRT firmy NVIDIA do szybkiego wnioskowania na surowych klatkach termowizyjnych:
import sys
Pogłębione FAQ dla deweloperów (Rozwiązywanie problemów technicznych)
Dlaczego tak trudno znaleźć niezawodny moduł kamery termicznej MIPI CSI-2 ze wsparciem sterowników dla Raspberry Pi lub Jetson?
Większość starszych układów mikrobolometrycznych nie ma nawet nadajników MIPI; wyprowadzają dane przez SPI lub równoległe połączenia o dużej liczbie pinów. Aby działały przez MIPI, producenci muszą dodać niestandardowy układ serializera lub mostka tuż za rdzeniem czujnika.
Ponieważ te projekty sprzętowe są zastrzeżone, standardowe kompilacje Linuksa nie zawierają dla nich natywnych sterowników jądra. Aby kamera działała na Raspberry Pi lub Jetson, producent musi napisać niestandardowe sterowniki jądra i nakładki Device Tree (DTO), które konfigurują prędkości zegara, ustawienia linii i polecenia I2C dla wewnętrznego układu ASIC. Moduły opisane w tym poradniku upraszczają to, obsługując korekcję niejednorodności i mapowanie uszkodzonych pikseli w sprzęcie mechanicznym, co pozwala rdzeniowi na wyprowadzanie standardowych formatów (takich jak surowe Y14 lub UYVY) przez połączenie MIPI.
Czy mogę uzyskać strumieniowanie termowizyjne w czasie rzeczywistym o wysokiej rozdzielczości przez MIPI do zastosowań w dronach lub robotyce?
Sprawdźmy liczby: matryca 640 x 512 działająca z częstotliwością 30 Hz przekłada się na około 9,8 miliona pikseli na sekundę. Podczas gdy SPI nie jest w stanie obsłużyć tej przepustowości, MIPI CSI-2 radzi sobie z tym z łatwością, a nawet może przesyłać strumieniowo surowe 14-bitowe zestawy danych radiometrycznych wraz z 8-bitowym przestrzennym wideo AGC, aby pomóc modelom wizji komputerowej działać szybciej.
Ta zdolność bezpośredniego strumieniowania jest bardzo korzystna dla dronów. Wyeliminowanie opóźnień konwersji zapewnia, że systemy autopilota mogą reagować natychmiastowo podczas szybkich lotów na niskiej wysokości. Ponadto, niskonapięciowe sygnalizowanie różnicowe (LVDS) MIPI obniża zużycie energii i ogranicza zakłócenia elektromagnetyczne (EMI), co chroni wrażliwe odbiorniki GPS, telemetrii i RC drona.
Czy te moduły termowizyjne MIPI obsługują pełny radiometryczny pomiar temperatury do samodzielnie budowanych celowników termowizyjnych lub inspekcji przemysłowych?
Standardowe potoki integracyjne obsługują te dane w jednej z dwóch konfiguracji:
1. Strumieniowanie w dwóch formatach (dwa węzły V4L2): Sterownik sprzętowy rejestruje jednocześnie dwa urządzenia wirtualne. Jedno urządzenie (/dev/video0) strumieniuje przetworzone 8-bitowe obrazy wizualne (takie jak profile w skali szarości lub mapowane kolorami ironbow do wyświetlania). Drugie urządzenie (/dev/video1) strumieniuje surowe 14-bitowe dane zawierające liniowe zliczenia cyfrowe (ADU) powiązane z rzeczywistymi odczytami energii mikrobolometru.
2. Pakowanie z nakładką metadanych: Nieschładzany rdzeń wyprowadza pojedynczy strumień o wysokiej rozdzielczości, w którym surowe 14-bitowe dane znajdują się w ładunku ramki rdzenia, a obliczone metadane w Kelwinach/Celsjuszach są dołączane na początku lub na końcu każdego pakietu ramki.
Aby przekonwertować surowe wartości pikseli na rzeczywiste temperatury, system hosta wykonuje podstawowe tłumaczenie liniowe:
T_Celsjusz = (Zliczenie piksela × Rozdzielczość) - Przesunięcie
Na przykład, używając typowej skali rozdzielczości, gdzie 1 LSB = 0,04 K, surowa wartość piksela 9300 przekłada się na:
T = (9300 × 0,04) - 273,15 = 98,85°C
Ta wysoka precyzja, dostępna bezpośrednio poprzez przechwytywanie opencv oparte na Pythonie, umożliwia samodzielnie budowanym celownikom termowizyjnym i zautomatyzowanej diagnostyce fabrycznej wykonywanie rzeczywistych operacji, takich jak śledzenie w czasie rzeczywistym, profilowanie termiczne komponentów PCB i automatyczne alarmy przeciwpożarowe.
Jak obsługiwać zwroty sprzętu, naprawy uszkodzonych czujników lub wymianę modułów podczas skalowania projektu?
Nasza ustrukturyzowana, rejestrowana ścieżka Polityka zwrotów i reklamacji szczegółowo opisuje kroki zwrotu modułu do oceny lub inicjowania wymian systemowych, aby Twoje projekty przebiegały zgodnie z harmonogramem. Każdy zwrócony moduł jest analizowany w celu oceny stanu komponentów, zgodności diagnostycznej i statusu kalibracji matrycy FPA, co zapewnia, że wymiany spełniają fabryczne standardy wydajności.
📚 Referencje i dalsza lektura
- Standard branżowy: Wikipedia Obrazowanie termiczne (Podstawy termografii)
- Partner w zakresie komponentów sprzętowych: Technologia przetwarzania układów JM
- Przewodnik integracji: Najlepszy moduł kamery termowizyjnej MIPI do integracji z Raspberry Pi i dronami
- Przewodnik po czujnikach: Plan integracji miniaturowego niechłodzonego modułu termowizyjnego LWIR 640
- Dokument polityki: Przewodnik operacyjny dotyczący zwrotów i reklamacji obrazowania termicznego