Руководство по модулям тепловизионных камер: выбор подходящего ядра LWIR для дронов, самостоятельных проектов и потоковой передачи в реальном времени
4 июня 2026 г.
Лучшие модули тепловизионных камер для Raspberry Pi: руководство по потоковой передаче LWIR высокого разрешения (2024)
5 июня 2026 г.
Инфракрасный модуль тепловизионной камеры: Полное инженерное руководство по неохлаждаемым LWIR-ядрам
Годами тепловидение жило за бархатным канатом. Пятизначные ценники, экспортные ограничения ITAR и проприетарные экосистемы не давали настоящей инфракрасной функциональности попасть в руки тех самых людей, которые могли бы сделать с ней что-то действительно интересное — строителей дронов, энтузиастов Raspberry Pi, инженеров встраиваемого зрения и любителей самодельных тепловизионных прицелов. Сегодня канат ослаб, но вот в чем дело: на его месте выросла новая стена. Зайдите на любой форум мейкеров, и вы услышите одну и ту же жалобу снова и снова: дешевые сенсоры 256×192, выдающие размытые, пикселизированные кадры, которые абсолютно бесполезны для серьезной инспекции, поисково-спасательных работ или точной работы с прицелами. Настоящее напряжение теперь не только в цене — это мучительный баланс между разрешением, задержкой, гибкостью объектива и интеграционными головными болями, которые возникают при сопряжении тепловизионного ядра с хост-платформой.
Это руководство существует, чтобы снести эту стену. Мы разберем технологию неохлаждаемых LWIR (длинноволновых инфракрасных) ядер от микроболометра и выше, пройдемся по математике разрешения, которая действительно имеет значение, расшифруем выбор объектива во всем диапазоне 5–150 мм и наметим конкретные пути интеграции для встраиваемых платформ, таких как Raspberry Pi, Arduino и чувствительные к весу подвесы дронов. К тому времени, как вы закончите чтение, у вас будет четкая система принятия решений — такая, которая точно скажет вам, какая спецификация модуля соответствует полезной нагрузке вашего дрона, вашей потоковой установке на Pi или вашему ручному прицелу, без переплаты за брендинг уровня DJI. Это та глубина, которая отличает случайную покупку от инженерно обоснованной.
Содержание
- 👉 Что такое инфракрасный модуль тепловизионной камеры? — Ядра против готовых камер.
- 👉 Как на самом деле работают неохлаждаемые LWIR-ядра — Объяснение полной сигнальной цепочки.
- 👉 Разрешение расшифровано: 640×512 против 256×192 — Почему пиксели на цели имеют значение.
- 👉 Выбор объектива и руководство по полю зрения — Сопоставление фокусного расстояния с дальностью.
- 👉 Интеграция: Raspberry Pi, Arduino и дроны — Рабочие процессы «подключи и работай».
- 👉 Рекомендуемый продукт и реальные характеристики — Ядро Mini 640×512.
- 👉 Контрольный список ключевых критериев покупки — На чем настаивать.
- 👉 Реальные применения — От ПСР до прицелов.
- 👉 Часто задаваемые вопросы — Прямые ответы на распространенные вопросы.
Что такое инфракрасный модуль тепловизионной камеры?
Инфракрасный модуль тепловизионной камеры — то, что мы в мастерской называем "ядром" — это чистый формирователь изображения, который находится в сердце каждого тепловизионного устройства. Обычно он сводится к трем тесно связанным частям: инфракрасному сенсору (матрице микроболометров в фокальной плоскости), объективу, который фокусирует длинноволновое излучение на этот сенсор, и плате обработки, которая превращает необработанные сигналы детектора в пригодный для использования видеопоток или радиометрические данные. Вот ключевой момент для понимания: модуль — это не готовый продукт. У него нет прочного корпуса, нет батареи, нет дисплея и нет потребительской упаковки. Это OEM-строительный блок, предназначенный для жизни внутри чего-то большего, что вы строите вокруг него.
Модуль ядра против готовой тепловизионной камеры
Это различие имеет большее значение, чем осознает большинство покупателей. Готовая тепловизионная камера — это герметичный потребительский или промышленный конечный продукт — ручной инспекционный прибор, готовая полезная нагрузка дрона, камера безопасности. Вы покупаете ее, вы используете ее, и вы живете с той оптикой, интерфейсом и прошивкой, которые производитель выбрал за вас. Модуль ядра, с другой стороны, дает вам инженерную свободу самостоятельно определять систему. Вы выбираете объектив под точное поле зрения, решаете, как видео будет захватываться и обрабатываться, и проектируете архитектуру крепления и питания под свое приложение. Именно поэтому интеграторы дронов, разработчики прицелов и встраиваемых систем тяготеют к модулям: им нужны контроль, экономия веса и эффективность затрат, которые герметичная розничная камера никогда не сможет дать.

Почему LWIR доминирует в дронах и DIY-применениях
Тепловидение работает в инфракрасной части электромагнитного спектра, далеко за пределами того, что может уловить человеческий глаз. Длинноволновой инфракрасный диапазон, примерно от 8 до 14 микрон, является оптимальным для визуализации объектов при обычных температурах окружающей среды — людей, животных, механизмов, электрических неисправностей и рельефа. Объекты с температурой около комнатной излучают пик своего теплового излучения именно в этом диапазоне, что делает LWIR естественным выбором для пассивной, всепогодной, круглосуточной визуализации, не требующей никакой подсветки. В сердце LWIR-ядра находится фокальная матрица (FPA) — сетка микроскопических микроболометрических пикселей, каждый из которых реагирует на поступающее тепло. Чтобы глубже понять, как тепловое излучение улавливается и превращается в изображение, ознакомьтесь с нашим разбором принципов тепловидения, где подробно излагается лежащая в основе физика.
Как на самом деле работают неохлаждаемые LWIR-ядра
Послушайте, понимание того, как неохлаждаемое ядро превращает невидимое тепло в четкое изображение, — это самое ценное, что может знать покупатель. Это проясняет ценообразование, объясняет спецификации и показывает, почему одни модули абсолютно превосходят другие. Путь от фотона к пикселю — это элегантная цепочка физики и электроники, и как только вы ее поймете, вы уже никогда не будете читать спецификации по-прежнему.
Микроболометрический сенсор: объяснение
Микроболометр — это бьющееся сердце каждого неохлаждаемого теплового модуля. Представьте плотную сетку микроскопических детекторных элементов, каждый из которых подвешен на крошечных термоизолированных ножках. Когда длинноволновое инфракрасное излучение попадает на пиксель, он поглощает энергию и совсем немного нагревается. Это минутное изменение температуры меняет электрическое сопротивление материала детектора, и схема считывания измеряет это изменение сопротивления, пиксель за пикселем, чтобы строить полную тепловую карту сцены много раз в секунду. Просто в концепции, предельно точно в исполнении.
В индустрии используются два материала детекторов. Оксид ванадия (VOx) обеспечивает отличную чувствительность и является рабочей лошадкой высокопроизводительных ядер, в то время как аморфный кремний (a-Si) оправдывает себя масштабируемостью производства. Не менее важен шаг пикселя — физическое расстояние между детекторными элементами, обычно 12 мкм или 17 мкм. Меньший шаг 12 мкм вмещает большее разрешение в более компактный и легкий сенсор, что является решающим преимуществом для полезной нагрузки дронов, где каждый миллиметр и грамм на счету. Германиевая оптика, фокусирующая ИК-излучение на эту матрицу, — это отдельная специализированная дисциплина; поставщики прецизионной инфракрасной оптики, такие как Цзиньдэ , показывают, насколько требовательной стала эта отрасль производства линз.
Неохлаждаемые и охлаждаемые: критический компромисс
Тепловые ядра делятся на два основных семейства, и этот выбор определяет все в стоимости, весе и поведении вашей системы. Таблица ниже представляет решающие контрасты бок о бок.
| Характеристика | Неохлаждаемый LWIR | Охлаждаемый тепловой |
|---|---|---|
| Стоимость | От низкой до умеренной | Очень высокая (часто в 5–10 раз) |
| SWaP (Размер/Вес/Мощность) | Компактный, легкий, низкое энергопотребление | Large, heavy, power-hungry cryocooler |
| Startup Time | Instant-on (seconds) | Several minutes (cooldown required) |
| Чувствительность NETD | Excellent (sub-50mK achievable) | Superior (single-digit mK) |
| Lifecycle | Long, no moving parts | Limited by cryocooler wear |
| Best For | Drones, DIY, inspection, scopes | Long-range military, scientific research |
For the overwhelming majority of drone, maker, and inspection jobs, uncooled wins hands down. No cryocooler means no bulky refrigeration assembly, dramatically lower weight, instant readiness, and a price point that finally makes serious thermal imaging genuinely accessible. And don't sleep on the ruggedized board-to-board connectors that link these cores to host electronics — vibration-resistant interconnects from manufacturers like Amphenol are what keep your module alive through the harsh shake of drone flight.
NETD, Thermal Sensitivity & Image Clarity
NETD — Noise Equivalent Temperature Difference — is the spec that separates a crisp, readable image from a noisy, grainy mess. Measured in millikelvin (mK), NETD describes the smallest temperature difference the sensor can reliably tell apart from electronic noise. Lower is better, plain and simple. A core rated below 50mK can resolve subtle thermal contrasts — the faint warmth of a footprint, the early signature of an overheating connection — that a noisier sensor would just smear into the background. When you're scanning a field for survivors or hunting an electrical hotspot, that sensitivity is the difference between a confident finding and a missed one.
Resolution Decoded: Why 640×512 Beats 256×192
Resolution is the most misunderstood — and most marketing-abused — spec in the entire thermal industry. Let's settle it with simple math. A 640×512 sensor delivers 327,680 individual thermal pixels. A 256×192 sensor delivers a measly 49,152. That's not a modest bump; it's 6.6 times more thermal data describing the exact same scene. Every one of those extra pixels means more detail, sharper edges, and earlier detection of small heat signatures.
The DRI Range Formula for Drone Payloads
Engineers think in terms of "thermal pixels on target." The DRI model — Detection, Recognition, Identification — quantifies how many pixels need to land on an object before you can simply spot it (detection), tell what kind of object it is (recognition), or positively identify it (identification). Because higher resolution puts more pixels on every target at a given distance, a 640 core dramatically stretches your effective DRI range compared to a 256 core running the identical lens. For a drone sweeping a wide area at altitude, that translates directly into covering more ground per pass while still resolving a person or animal far below. The environmental stability of a high-resolution core under field stress matters just as much; our high and low temperature humidity testing shows how rigorous validation keeps imagery stable across punishing conditions.
When Lower Resolution Is Acceptable (and When It Isn't)
Beware the digital zoom trap. Plenty of budget modules advertise impressive-sounding figures pulled off through interpolation or upscaling — software that invents pixels rather than capturing them. Interpolation can never add genuine thermal information; it just smooths and stretches whatever little data is actually there. Only native sensor resolution improves real clarity. That said, a 256×192 core isn't worthless. For close-range hobby glances, simple presence detection, or budget learning projects, it'll do the job. But the moment your application demands positive identification, long detection range, or reliable inspection, the 640 class becomes the practical floor — no two ways about it.
Выбор объектива и руководство по полю зрения
Once you've locked in your resolution, the lens decides how that resolution gets spread across the scene. Focal length governs the fundamental trade-off between field of view (how wide an area you see) and range (how far you can resolve detail). A short focal length gives you a wide, sweeping view that's perfect for scanning — but every object looks small. A long focal length zooms in, putting more pixels on distant targets at the cost of a narrow field. The featured Mini core supports a genuinely impressive spread of focal lengths: 5, 9, 13, 18, 35, 50, 75, 100, and 150mm, letting you tune the system precisely to your mission.
Focal Length vs. Field of View
| Фокусное расстояние | Поле зрения | Best Use Case | Effective Range |
|---|---|---|---|
| 5–9mm | Very wide | Indoor scanning, short-range drone surveys | Short |
| 13–18mm | Balanced / general | All-purpose inspection and observation | Medium-short |
| 35–50mm | Narrow | Medium-range inspection, spotting scopes | Medium-long |
| 75–150mm | Very narrow / telephoto | Long-range surveillance, perimeter security | Long |
Interchangeable Lenses for DIY Thermal Scopes
For scope builders and OEM integrators, lens interchangeability is a game-changer. The same compact core can serve as a wide-angle drone scanner one day and a high-magnification spotting scope the next, just by swapping optics. The lens material matters more than people think: infrared optics are crafted from germanium, which is transparent to long-wave radiation but exotic and fiddly to manufacture. Quality cores also build in athermalization — optical design that keeps the image in focus across wide temperature swings, so your scope stays sharp whether it's a freezing dawn or a baking afternoon. For deeper authority on this specialized optical discipline, infrared lens specialists such as Цзиньдэ offer a window into the engineering rigor behind germanium optics.
Integration: Raspberry Pi, Arduino & Drone Payloads
A brilliant sensor is dead weight if you can't get clean data out of it. This is where the featured Mini core really earns its keep, and where a lot of cheaper alternatives fall flat on their face with proprietary interfaces and missing documentation.
USB UVC Plug-and-Play with Raspberry Pi
The single most important integration feature is the module's USB output conforming to the UVC (USB Video Class) standard. UVC is the same protocol your everyday webcam uses, and it means the thermal core shows up to a Linux host as a standard video device — no proprietary drivers to compile, no kernel patching, no vendor lock-in nonsense. On a Raspberry Pi, you literally just plug it in and the system recognizes it. From there you can grab frames using v4l2 at the system level, pull them into OpenCV for processing, or knock out a handful of lines of Python to throw a live thermal feed on screen within minutes. The uncooled core's low-latency architecture keeps that stream smooth — which is essential for robotics, real-time monitoring, and embedded vision pipelines where lag simply won't fly.
Arduino & SDK-Based Control
Arduino plays a different but complementary role. It's not built to crunch high-resolution video, so in a well-architected system the Arduino handles the control logic — triggering captures, relaying GPIO events, driving servos, or managing alert relays — while a Raspberry Pi or host PC handles the heavy video processing. Through the supported SDK, developers can go well beyond simple imagery to access genuine radiometric data: per-pixel temperature values that enable automated thresholds, hotspot alerts, and smart custom applications. That division of labor gives makers a robust, scalable foundation to build on.
Drone Payload Integration (DJI-Comparable)
For aerial work, SWaP is everything. The Mini core's tiny 21mm × 21mm footprint is a decisive advantage — it slips into compact gimbals and tight payload bays where bulkier cameras just won't fit, and its low weight protects your precious flight time. A clean integration also demands attention to power draw, vibration isolation (a soft-mount or damped gimbal protects image stability), and secure, rattle-proof cabling. Robust connectors from suppliers like Amphenol earn their place here, surviving the constant vibration of flight. Ready to explore complete thermal solutions? Browse our full thermal imaging product range to see how cores fit into finished systems.
Featured Product: Mini 640×512 Uncooled LWIR Module
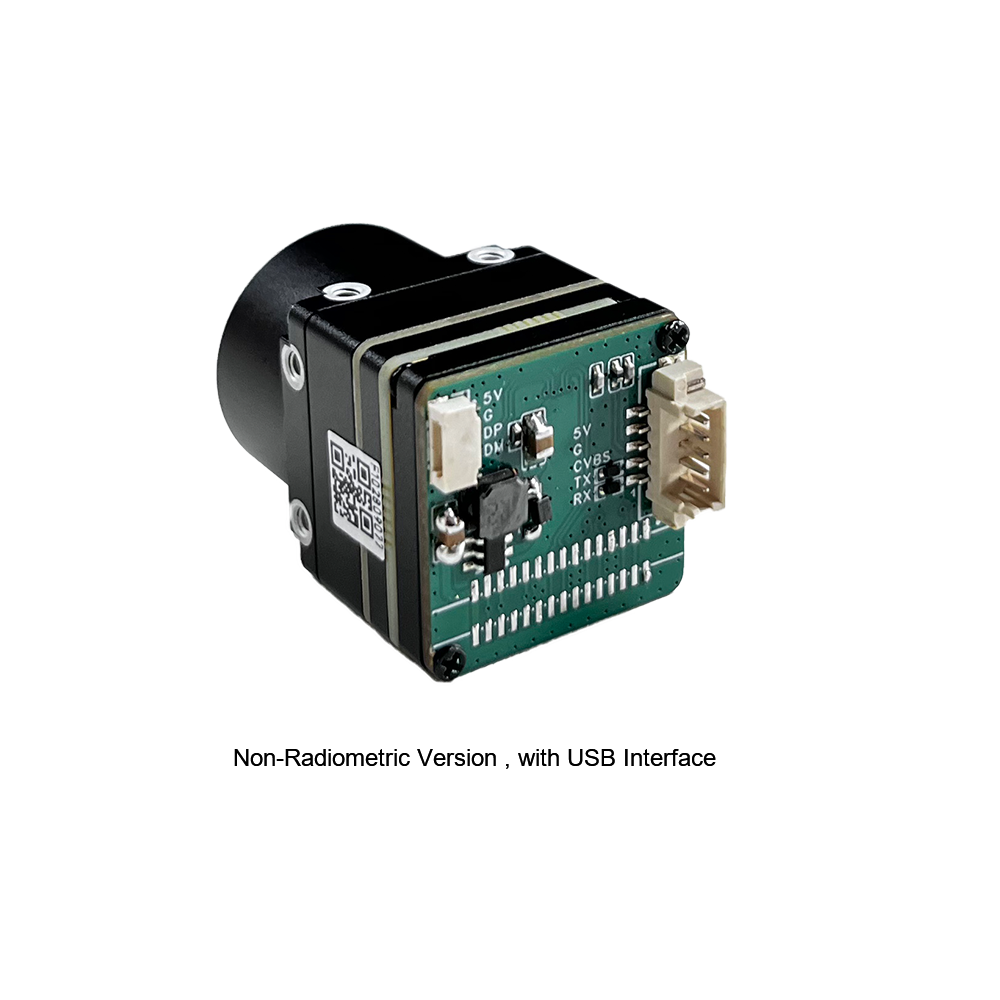
The standout pick for makers and OEM integrators chasing DJI-comparable performance without the premium branding is the Mini uncooled infrared thermal imaging module. It's engineered around three core strengths: sharp and crisp image presentation, an exceptionally compact form factor, and a genuinely low cost that opens serious thermal imaging up to a far wider audience. With its Mini-size of 21mm × 21mm, a deep bench of interchangeable lenses, optional 640-class resolution, and stable performance with strong environmental adaptability, it serves as a flexible, professional-grade foundation for everything from handheld scopes to lightweight aerial payloads.
| Спецификация | Detail |
|---|---|
| Product Name | Uncooled LWIR USB Mini 640×512 Thermal Imaging Camera Core Module |
| Тип детектора | Uncooled LWIR Microbolometer |
| Разрешение | 640×512 / 640×480 (optional) |
| Module Size | 21mm × 21mm (Mini-Size) |
| Lens Options | 5 / 9 / 13 / 18 / 35 / 50 / 75 / 100 / 150 мм |
| Выходной интерфейс | USB (UVC Plug-and-Play) |
| Best For | Drones, Raspberry Pi, Arduino, DIY Thermal Scopes |
| Image Quality | Sharp, crisp presentation |
| Адаптация к окружающей среде | Strong, stable performance |
| Comparable To | DJI thermal payloads (at lower cost) |
Посмотреть детали и цены продукта ➔
Контрольный список ключевых критериев покупки
Cutting through the marketing noise takes a disciplined checklist. Before you commit to any infrared thermal camera module, run it against the criteria below — every one of them rooted in real-world performance rather than spec-sheet theater.
- ✅ Разрешение: Insist on 640×512 for any serious detection, recognition, or inspection work. Treat 256×192 as hobby-grade only.
- ✅ NETD Sensitivity: Look for sub-50mK to guarantee crisp, low-noise imagery that reveals subtle thermal contrasts.
- ✅ Output Interface: UVC over USB means driverless, plug-and-play integration on Raspberry Pi and standard hosts.
- ✅ Lens Flexibility: Interchangeable focal lengths (5mm–150mm) let one core serve many missions.
- ✅ Form Factor & Weight: A compact 21×21mm footprint is critical for drone SWaP and tight scope housings.
- ⚙️ SDK & Platform Support: Confirm radiometric access and documented software support for your platform.
- ⚙️ Environmental Ratings: Demand strong adaptability and validated stability across temperature and humidity extremes.
- ✅ Cost-vs-Performance Ratio: Seek DJI-comparable imagery without paying for a premium brand badge.
Red Flags to Avoid When Buying Cheap Modules
Be especially wary of three traps. First, interpolated resolution claims — numbers puffed up by software upscaling rather than native sensor pixels. Second, undocumented proprietary interfaces that lock you into a single vendor's tooling and leave you stranded without an SDK. Third, missing or vague NETD figures, which almost always signal a noisy sensor the manufacturer would rather not put a number on. A reputable core publishes honest native resolution, a clear NETD value, and a documented, standards-based output path. If they're hiding any of those, walk away.
Реальные применения
The versatility of a compact 640-class LWIR core shows up across an astonishing range of fields. In drone-based search and rescue, a wide-FOV lens lets a UAV sweep huge swaths of terrain, the warm signature of a missing person standing out sharply against cool ground even in pitch darkness — and that same airframe is equally at home running agricultural surveys mapping crop stress and irrigation patterns.
For DIY thermal rifle and spotting scopes, the tiny module paired with a long 75–150mm lens delivers high-magnification target identification that hobbyists used to only dream about. In building and electrical inspection, the core's sub-50mK sensitivity surfaces overheating breakers, loose connections, and hidden moisture intrusion long before they turn into failures, turning routine maintenance into genuine prevention.
The maker community has embraced these modules for Raspberry Pi projects and embedded vision — autonomous robots that navigate by heat, smart monitoring rigs, and experimental computer-vision pipelines all benefit from clean UVC streaming. And in perimeter security, a fixed telephoto core gives you reliable, all-weather intrusion detection across fences and boundaries where visible cameras go blind in the dark. In every one of these scenarios, the same underlying specs — resolution, lens choice, sensitivity, and form factor — quietly decide the outcome.
Часто задаваемые вопросы
Can I integrate a thermal camera module with a Raspberry Pi or Arduino for real-time high-res streaming?
v4l2, OpenCV, or a few lines of Python and have a live thermal feed running within minutes. The uncooled core's low-latency architecture keeps the stream smooth, which matters for real-time monitoring, robotics, and embedded vision pipelines. For Arduino-based systems, the workflow is slightly different — Arduino typically handles control logic, triggering, or relaying GPIO events, while a Pi or host PC manages the heavy video processing. Through our supported SDKs you can also access radiometric temperature data, enabling automated alerts and custom maker projects with genuine high-resolution thermal output.Cheap 256×192 modules offer poor image quality. What resolution should I choose for clear thermal images?
I want to build a custom DIY thermal scope or drone payload similar to DJI but at lower cost. Is a compact module available?
📚 References & Further Reading
- Industry Standard (Connectors): Amphenol — Ruggedized Interconnect Solutions
- Industry Standard (IR Optics): Jinde — Infrared & Germanium Optics
- Связанное руководство: Thermal Imaging Principles Explained
- Связанное руководство: High & Low Temperature Humidity Testing
- Каталог продукции: Full Thermal Imaging Product Range