
Thermal Camera Module Guide: Choosing the Right Uncooled IR Sensor for DIY, Drone & Linux Projects
2026年6月4日
Infrared Thermal Camera Module Guide: Choosing the Right Uncooled LWIR Core for Drones, Raspberry Pi & DIY Projects
2026年6月5日
Thermal Imaging Camera Module Guide: Choosing the Right LWIR Core for Drones, DIY & Real-Time Streaming
Look, picking a thermal imaging camera module has turned into one of the most confusing buys in modern embedded engineering. The market is flooded with conflicting claims—cheap MLX-class sensors promising "thermal vision" that hand you a blurry 32x24 pixel grid, versus DJI-locked ecosystems that run thousands of dollars and give you zero hardware flexibility. Whether you're building a drone payload, a DIY thermal scope, a real-time streaming rig for a Raspberry Pi, or a PCB hotspot inspection station, the wrong core resolution, lens focal length, or output interface will sabotage your whole project before the first frame ever renders.
Here's the deal: this guide cuts through the noise. We break down exactly how uncooled LWIR (Long-Wave Infrared) microbolometer technology works, why 640×512 resolution has become the sweet spot for serious applications, how to match focal length (5mm to 150mm) to detection range, and how to pull off smooth, low-latency USB/UVC streaming on embedded platforms. By the time you're done reading, you'll be able to spec a thermal imaging camera module with engineering precision—matching sensor resolution, lens, frame rate, and interface to your specific drone, inspection, or measurement job. Let's build it right.
Table of Contents
- 👉 What Is a Thermal Imaging Camera Module?
- 👉 How Uncooled LWIR Microbolometer Technology Works
- 👉 Resolution Decoded: 384×288 vs 640×512 vs 640×480
- 👉 Lens & Focal Length Selection (5mm–150mm)
- 👉 Output Interfaces & Real-Time Streaming
- 👉 Application Deep-Dives: Drones, DIY Scopes, PCB Inspection
- 👉 Featured Product: Mini 640×512 LWIR Core (Specs Table)
- 👉 Integration Checklist for Engineers
- 👉 Frequently Asked Questions
What Is a Thermal Imaging Camera Module?
A thermal imaging camera module is a self-contained imaging subsystem—a sensor, an ASIC/ISP, a lens, and an output interface all bundled together—that converts invisible infrared radiation into a visible thermal image. The important part: it's designed to drop into a larger host device, not to sit on your desk as a standalone camera. This is the engine that powers everything from commercial drone payloads to handheld inspection tools.
You've got to separate a module from a complete camera in your head. A module is the "core" engine: no display, no battery, no rugged housing. That stripped-down nature is exactly what gives engineers and makers the freedom to build custom payloads—mounting the core inside a 3D-printed scope body, a drone gimbal, or a benchtop inspection rig. You supply the host platform; the module supplies the thermal vision.
Most serious modules operate in the LWIR band, the 8–14 µm region of the electromagnetic spectrum. This band is ideal for spotting ambient-temperature objects—people, running machinery, energized electronics—because those targets emit most strongly in long-wave infrared. MWIR and SWIR bands, by contrast, suit specialized industrial or scientific work but demand costlier, often cooled hardware. There's also a fundamental split between cooled and uncooled designs, which we'll get into in the next section.

Module Anatomy: The 4 Core Components
Every capable thermal imaging camera module is built from four functional blocks. Here's what's under the hood:
- ⚙️ Microbolometer focal plane array (FPA) — the grid of heat-sensitive pixels that does the actual detecting.
- ⚙️ Image signal processor / readout integrated circuit (ROIC) — reads the array and applies the corrections that turn raw data into a clean picture.
- ⚙️ Optics — a germanium or chalcogenide lens that focuses LWIR energy onto the FPA.
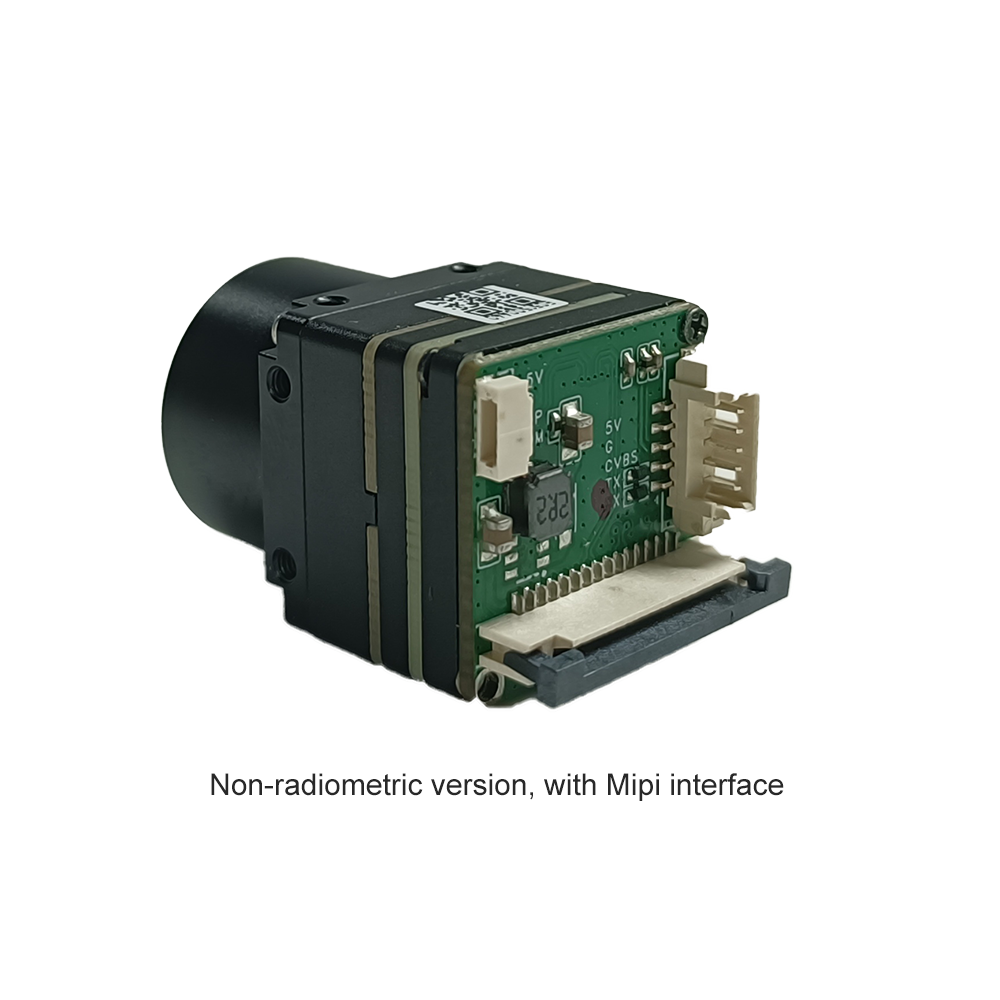
- ⚙️ Output interface — USB/UVC, MIPI, analog, or LVDS, delivering frames to your host.
If you're weighing entry-level resolution options, our breakdown of the MD-Series 384×288 gold specification module is a practical starting point.
How Uncooled LWIR Microbolometer Technology Works
The underlying physics is actually elegant. Every object above absolute zero emits infrared radiation in proportion to its temperature. Inside the module, the microbolometer array packs thousands of microscopic pixels engineered to absorb LWIR photons. When IR energy strikes a pixel, that pixel heats up a touch, changing its electrical resistance. The ROIC measures this resistance change frame-by-frame across the entire array, mapping subtle temperature variations into a coherent thermal image. No visible light needed—these modules see in total darkness, through smoke, and across nasty environmental conditions.
The word "uncooled" is the real commercial breakthrough here. Older cooled thermal sensors need a cryogenic cooler to chill the detector down to extreme temperatures, which piles on bulk, weight, power draw, cost, and a failure-prone mechanical component. Uncooled microbolometers run at ambient temperature, which means smaller size, dramatically lower power consumption, lower cost, near-instant-on operation, and far longer mean time between failures (MTBF). For drones fighting weight and battery budgets—and for DIY builders fighting their wallets—uncooled tech is the only sensible call.
Pixel Pitch & Sensitivity (NETD Explained)
Two specs decide how good a thermal image really looks. The first is NETD (Noise Equivalent Temperature Difference), which tells you the smallest temperature difference the sensor can reliably pull out of the noise. Lower is better; a module rated below 50mK can resolve fine thermal gradients—the faint warmth of a marginally overheating resistor or the body heat of a person against a cool background. High-NETD sensors just smear those distinctions into noise.
The second is pixel pitch, the physical spacing between pixels, usually 12µm or 17µm. A smaller 12µm pitch packs more pixels into a smaller die, giving you both sharper images and a more compact module footprint—exactly what tight drone gimbals demand. Pitch and resolution together define how much real detail actually lands on your screen.
The Role of the ISP & Non-Uniformity Correction (NUC)
Raw microbolometer output is never perfectly uniform—individual pixels respond a little differently. The onboard ISP fixes this with Non-Uniformity Correction (NUC), often using a mechanical shutter to grab a flat reference and recalibrate the array. Layered on top you've got Automatic Gain Control (AGC), which optimizes contrast across the visible thermal range, plus digital detail enhancement that sharpens edges. Together these processes produce the "sharp and crisp image presentation" the Mini 640 module advertises. And don't kid yourself—the reliability of the physical board-to-board and USB connections carrying that processed signal matters enormously in embedded integration; connector vendors like Molex set the durability benchmark you should be looking for in vibration-heavy drone environments.
Resolution Decoded: 384×288 vs 640×512 vs 640×480
Resolution isn't a vanity metric—it directly determines detection capability. More pixels on a target means longer detection range and finer thermal detail. This relationship is formalized in the DRI standard (Detection, Recognition, Identification), which spells out how many pixels have to land on a target before you can merely detect it, recognize what it is, and finally identify it specifically. Every pixel you add pushes those three thresholds further out.
384×288 — The Cost-Effective Entry Point
A 384×288 module is the smart pick for low-power, small-volume, budget-conscious builds and short-range monitoring jobs. It delivers genuine thermal imaging without the cost or bandwidth burden of higher resolutions, which makes it ideal for compact handheld devices and entry-level inspection. For a full spec rundown, see our deep-dive on the MD-Series 384×288 cost-effective module.
640×512 / 640×480 — The Professional Standard
Stepping up to 640-class resolution gets you roughly 3.3× more pixels than a 384 sensor—a transformative jump for serious drone and inspection work. The extra pixel density extends detection range, sharpens fine detail, and gives you headroom for digital zoom and AI inference. The subtle difference between 640×512 and 640×480 comes down to the FPA variant and the resulting aspect ratio; the Mini module conveniently offers both options so you can match your downstream display or processing pipeline. Our Mini 640 ultra-compact deep-dive covers this in granular detail.
| Resolution | Total Pixels | Typical Use | Relative Cost |
|---|---|---|---|
| 384×288 | ~110,000 | Budget, short-range, handheld | $ |
| 640×480 | ~307,000 | Professional inspection, streaming | $$ |
| 640×512 | ~327,000 | Drone payloads, long-range | $$ |
If you're actively weighing a Mini 384 against a Mini 640 for your next build, our 2025 thermal module guide for fast, low-cost integration lays out the trade-offs side by side for engineers.
Lens & Focal Length Selection (5mm to 150mm)
Once resolution is nailed down, lens choice becomes the single biggest lever on real-world performance. The core principle is an inverse trade-off: focal length governs the relationship between field of view (FOV) and detection range. A short focal length gives you a wide FOV with close-range detail, while a long focal length narrows the FOV but concentrates pixels on distant targets to dramatically stretch detection distance.
Short Focal Lengths (5mm–18mm): Wide FOV Applications
Short lenses shine where you need to see a broad scene up close. PCB inspection, close-range thermography, handheld scanning, and indoor security all benefit from the wide field of view that 5mm to 18mm optics provide. On a dense circuit board, a short focal length keeps the whole assembly in frame while the 640 pixel grid resolves individual hot components.
Medium Focal Lengths (25mm–50mm): Balanced Drone Payloads
The 25mm to 50mm range is the workhorse for general-purpose drone mapping and perimeter security. It balances usable detection range against a FOV wide enough to cover ground efficiently during flight, which makes it the default recommendation for operators who need versatility instead of specialization.
Long Focal Lengths (75mm–150mm): Long-Range Detection
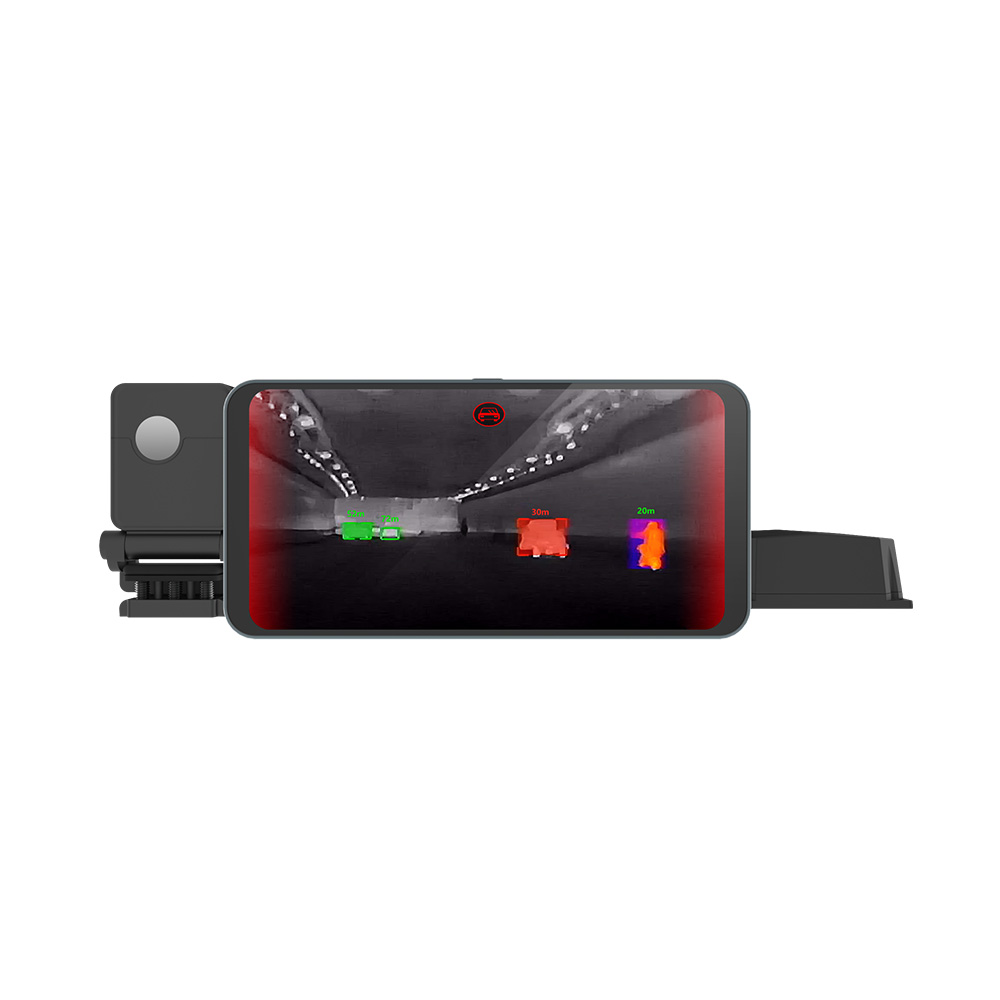
When the mission is high-altitude drone surveillance, long-distance asset monitoring, or search and rescue, long focal lengths from 75mm to 150mm earn their keep. By packing more pixels onto faraway targets, they maximize DRI ranges so a person or vehicle can be detected and recognized from a safe standoff distance.
Lens material matters as much as focal length—maybe more. Quality germanium optics with anti-reflective (AR) coating and athermalization keep the image stable across temperature swings. Cheap optics degrade thermal transmission, soften the image, and drift out of focus as the environment heats or cools—undermining the very sensor you paid good money for.
Because lens matching is application-specific, our engineering team is happy to recommend an exact focal length for your payload and detection requirements—just reach out via the consultation links throughout this guide.
Output Interfaces & Real-Time Streaming on Embedded Platforms
The output interface dictates how easily your module talks to a host. You've got four common options on the table:
- ⚙️ USB/UVC — the universal connector for modern development; plug-and-play and driver-free.
- ⚙️ MIPI CSI-2 — high bandwidth, but demands board-level integration and kernel-side support.
- ⚙️ Analog CVBS — dead simple, but limited to legacy displays.
- ⚙️ LVDS — great for industrial backplanes, unfriendly to hobbyists.
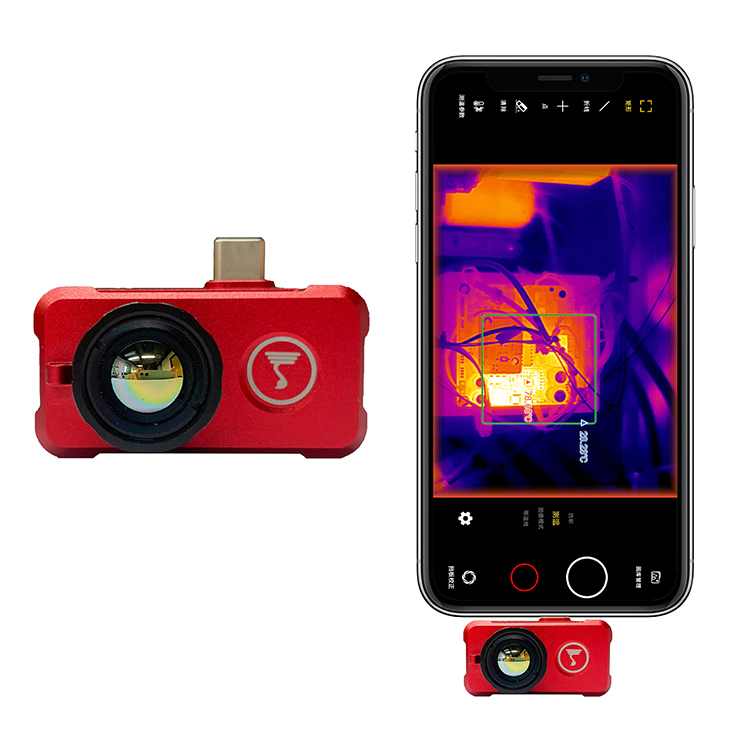
USB/UVC wins decisively for DIY and rapid integration because it's plug-and-play and driver-free on both Linux and Windows. No kernel hacking, no custom driver compilation—the module just shows up as a standard video device, exactly like a webcam. For prototyping and small-batch products, that slashes development time from weeks down to hours.
Streaming to Raspberry Pi & ESP32
For smooth live video, a stable, consistent frame rate of 25 to 30Hz matters more than headline resolution. The module has to hold that rate within the available USB bandwidth while keeping latency low enough for real-time overlays. This is exactly where cheap MLX-class I²C sensors fall on their face: they talk over a slow bus at tiny resolutions and low refresh rates, spitting out stuttering, blocky output that's useless for video. The Mini 640's stable UVC output sidesteps all of that, delivering latency-free, full-resolution thermal frames the moment it enumerates.
Software Stack & Toolchains
On the software side, a UVC module drops straight into the mainstream toolchain:
- ✅ OpenCV for computer vision.
- ✅ V4L2 for native Linux capture.
- ✅ Python pipelines for rapid scripting.
- ✅ GStreamer for robust streaming and transcoding.
Pairing the module with a well-supported carrier board speeds the build up even more—the Raspberry Pi HAT and embedded peripheral ecosystem from Waveshare is a popular foundation for thermal projects that need extra I/O, power management, or display output.
Power & Thermal Budget for Embedded Builds
Always account for voltage and current draw before you finalize a build. Single-board computers like the Raspberry Pi and microcontrollers like the ESP32 have limited USB power budgets, and an underpowered bus causes brownouts, dropped frames, or failed enumeration. When you're running a thermal module alongside other peripherals, a quality powered USB hub is cheap insurance against intermittent failures. For the complete end-to-end integration workflow, check our 2025 low-cost fast-integration guide.
Application Deep-Dives: Drones, DIY Scopes & PCB Inspection
Drone Thermal Payloads (DJI-Comparable, Custom-Built)
For aerial work, every gram and millimeter counts. The Mini 640's 21mm×21mm core is small and light enough to drop cleanly into compact gimbals and custom 3D-printed mounts, leaving room for telemetry overlay electronics. Real-world missions span agriculture (crop stress mapping), solar panel inspection (spotting failed cells from altitude), search and rescue, and powerline monitoring. The clincher is cost: this module delivers DJI-comparable thermal output at a fraction of the price of a locked proprietary payload—while leaving you in full control of the hardware.
DIY Thermal Scopes & Handheld Devices
For hunters, observers, and makers, the same core powers handheld thermal scopes with reticle overlays and battery-powered operation. This directly knocks down the persistent "cheap equals bad" myth: a genuine 640-class uncooled microbolometer with proper NUC and AGC produces clean, usable imagery that holds its own against far costlier commercial scopes, with the bonus of complete customization freedom.
PCB & Electronics Thermal Inspection
Pairing a short focal length with 640 resolution turns the module into a precision diagnostic tool. On densely populated boards, that pixel density resolves individual hotspots—a critical capability for R&D thermal profiling, failure analysis, and reflow validation. Engineers can pinpoint a marginally overheating component long before it causes a field failure.
Security, Surveillance & Industrial Monitoring
For fixed installations, the module's strong environmental adaptability and stable performance support 24/7, all-weather operation. Thermal vision spots intruders in complete darkness and flags overheating industrial machinery before breakdowns hit. For more on these scenarios, see our dedicated Mini 640 industrial inspection and security write-up.
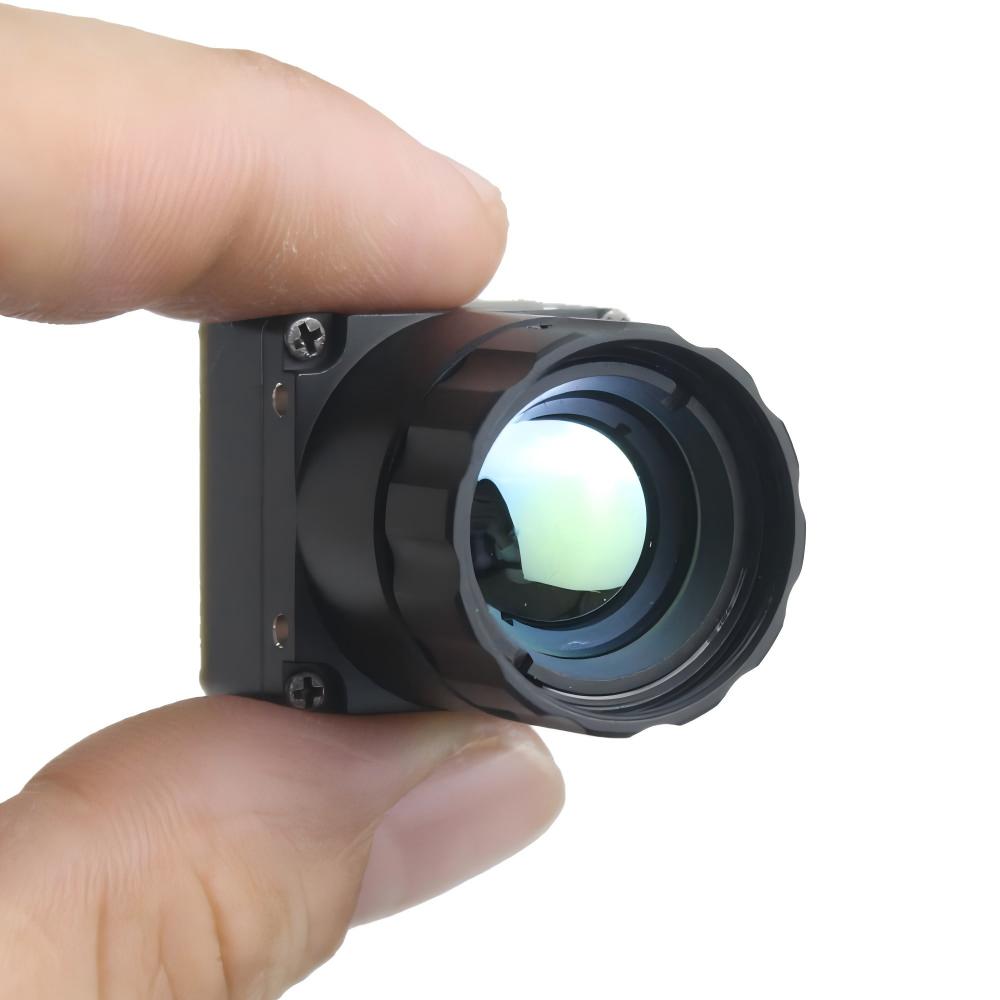
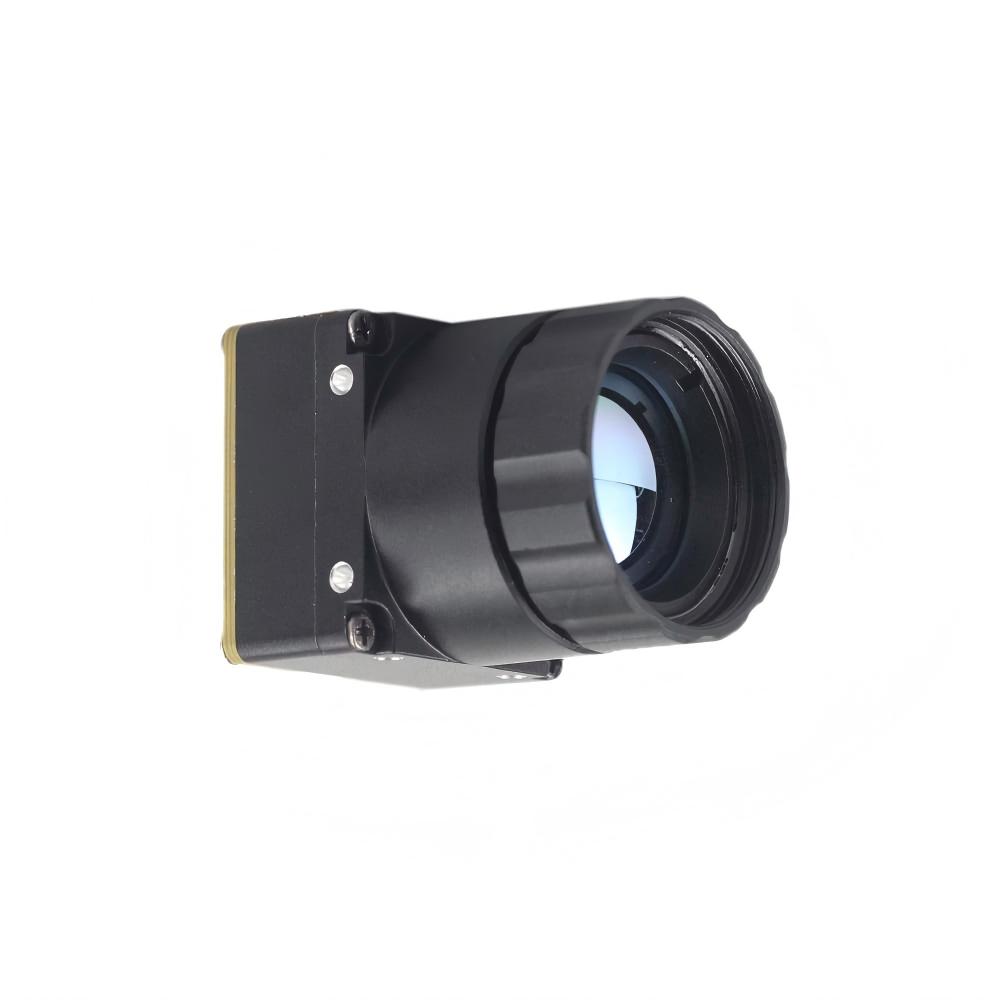
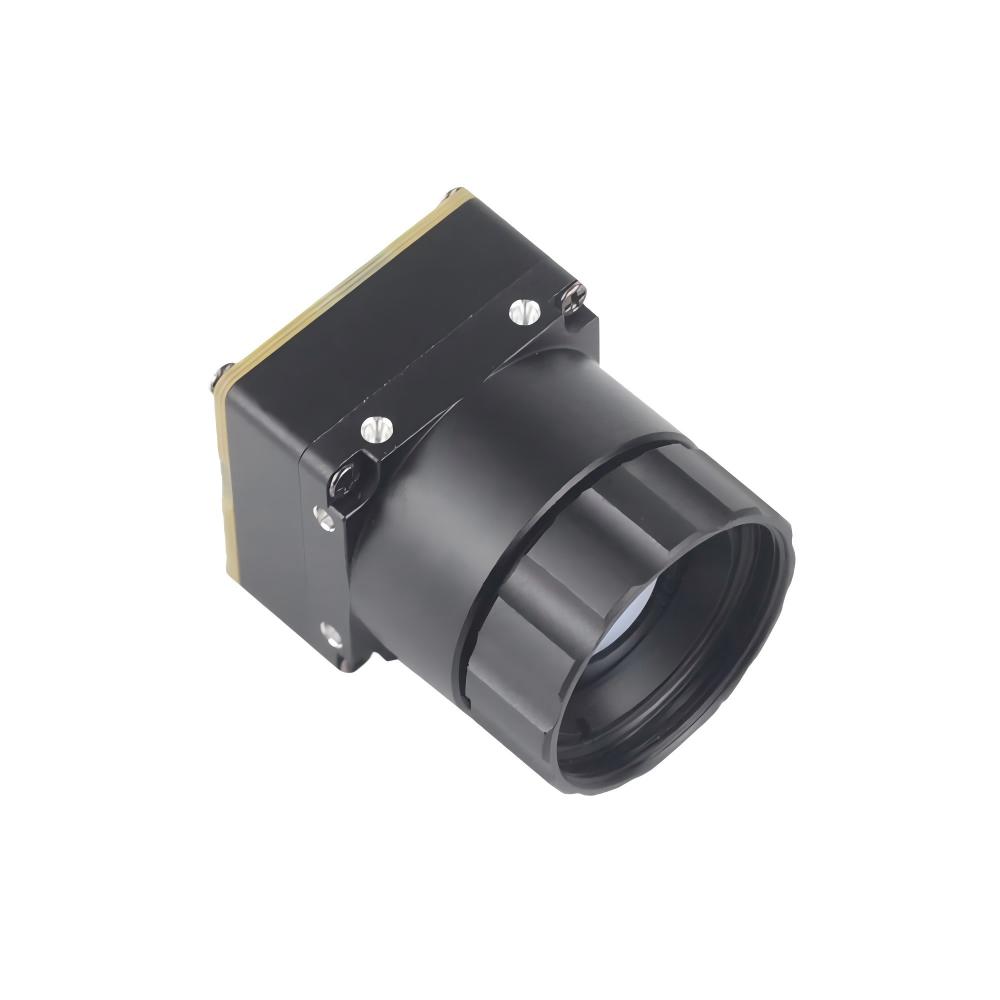
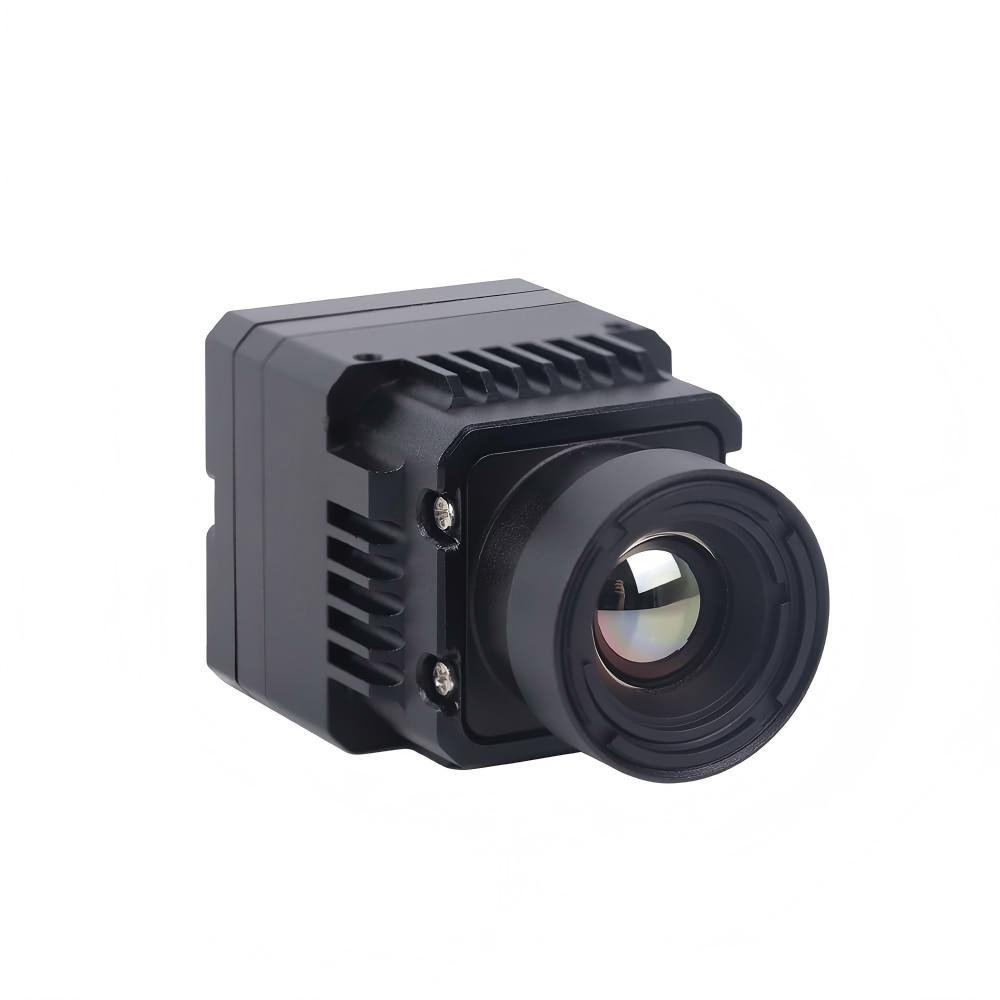
Featured Product: Mini 640×512 Uncooled LWIR Thermal Imaging Camera Module
Bringing it all together, the Mini 640×512 Uncooled LWIR module is our recommended core for drones, DIY scopes, and real-time embedded streaming. It delivers sharp and crisp image presentation, a compact size, and a low cost—a rare combination in this business. The ultra-compact 21mm×21mm footprint, optional 640×480 resolution, the full 5/9/13/18/35/50/75/100/150mm lens lineup, stable performance, and strong environmental adaptability make it adaptable to just about any thermal project you can dream up.

| Specification | Detail |
|---|---|
| Product Name | Uncooled LWIR USB Mini 640×512 Thermal Imaging Camera Core Module for Drones (DJI-Similar) |
| Sensor Type | Uncooled LWIR Microbolometer |
| Resolution | 640×512 / 640×480 (optional) |
| Module Size | 21mm × 21mm (ultra-compact) |
| Lens Options | 5 / 9 / 13 / 18 / 35 / 50 / 75 / 100 / 150 mm |
| Output Interface | USB / UVC (plug-and-play) |
| Image Quality | Sharp, crisp presentation with NUC & AGC |
| Environmental Adaptability | Strong / stable performance |
| Ideal Applications | Drones, DIY scopes, embedded vision, PCB inspection, security |
| Cost Position | DJI-comparable output, fraction of the cost |
View Product Details & Pricing ➔
If your project is strictly budget-driven and short-range, the Mini 384 is a worthy alternative that trades pixel count for lower cost and power draw—compare both in our MD-Series 384×288 specification post before you commit.
Integration Checklist for Engineers
Before you place an order, run through this engineer's checklist to make sure the module fits your system end to end:
- ⚙️ Resolution target — confirm it against the DRI requirements of your longest-range task.
- ⚙️ Focal length — select it by mapping field of view to your closest and farthest objects of interest.
- ⚙️ Output interface — verify your host platform supports it; for most rapid builds that means confirming UVC compatibility on your Linux or Windows machine.
- ⚙️ Power and bandwidth — tally total current draw across all USB peripherals and add a powered hub if you blow past your board's limits.
- ⚙️ Mechanical mounting — plan around the 21mm×21mm footprint, leaving clearance for the lens barrel and cable strain relief.
- ⚙️ Software pipeline — prototype early; stand up OpenCV or GStreamer capture before finalizing the enclosure so you catch frame-rate or latency issues while changes are still cheap.
Follow this sequence and you'll dodge the most common integration failures and get to a working first frame a whole lot faster.
Mini 640×512 Thermal Imaging Core Demo Video
Frequently Asked Questions: Thermal Imaging Camera Modules
Q1: What is the best thermal camera module for real-time high-res streaming to a Raspberry Pi or ESP32?
Q2: Can I use a Chinese thermal camera module for DIY scopes or drone builds without sacrificing image quality?
Q3: Which thermal sensor resolution and lens should I pick for my application (PCB inspection, drones, or measurement)?
📚 References & Further Reading
- Industry Standard (Embedded Ecosystem): Waveshare — Raspberry Pi HATs & Carrier Boards
- Industry Standard (Connector Reliability): Molex — Board-to-Board & USB Connectors
- Related Guide: 2025 Thermal Module Guide: Low-Cost Fast Integration for Engineers
- Related Guide: Mini 640 Uncooled LWIR Module: Ultra-Compact 640×512 Thermal Imaging
- Related Guide: MD-Series 384×288 Thermal Imaging Gold Specification