640x512 Thermal Camera Module: The Ultimate Guide for Drone & Edge AI Integration
2026年7月20日
Top UVC Thermal Camera Modules for Linux, Pi & Embedded Systems
2026年7月21日
MIPI Thermal Camera Module Guide: High-Res Edge AI Integration for Raspberry Pi & Drones
Let's face it: getting high-performance infrared imaging to play nice with embedded computing rigs has always been a major headache for systems architects. Back in the day, we were stuck routing slow, low-bandwidth SPI lines, messing with clunky proprietary parallel interfaces, or burning up power budgets with power-hungry, bulky USB setups. But things have changed. The arrival of the MIPI CSI-2 (Mobile Industry Processor Interface Camera Serial Interface 2) standard in the uncooled LWIR (Long-Wave Infrared) space has completely changed the game, bridging a massive physical and architectural divide.
By feeding raw, high-resolution thermal frames directly to the Host Processor's Image Signal Processor (ISP) or GPU—completely bypassing the usual USB and SPI bottlenecks—MIPI-enabled thermal modules have unlocked real-time, ultra-low-latency machine learning at the edge. We are talking about running heavy object-detection models on lightweight, mobile hardware like the Raspberry Pi 4/5 and NVIDIA Jetson Orin Nano without breaking a sweat.
This integration guide is your field manual. Whether you are building drone payloads, setting up autonomous factory robots, or designing smart monitoring hubs, this document breaks down the copper-level hardware layout, driver configurations, and software pipelines needed to interface a high-resolution thermal camera module MIPI core with modern host processors. We will also put some real-world, ASIC-driven commercial modules under the microscope so you can see how these concepts translate into physical hardware built for the elements.
Table of Contents
- 👉 1. MIPI CSI-2 vs. Legacy Thermal Interfaces: The Decisive Architectural Analysis
- 👉 2. Inside the Hardware: ASIC Processing & The Uncooled LWIR Microbolometer Signal Chain
- 👉 3. Embedded Integration: Step-by-Step Driver, Device Tree, & V4L2 Pipeline Setup
- 👉 4. Industrial Product Showcases: Technical Specification Comparison
- 👉 5. Edge AI and Aerial Systems Deployment Archetypes
- 👉 6. Deep-Dive Developer FAQs (Technical Troubleshooting)
1. MIPI CSI-2 vs. Legacy Thermal Interfaces: The Decisive Architectural Analysis
To see why a direct MIPI CSI-2 thermal pipe is the only sane choice for high-performance edge machine learning, let's look at what is happening under the hood compared to old-school buses like SPI, USB, or parallel (DVP) interfaces.
Mini 640×512 Thermal Imaging Core Demo Video
Here's the deal with legacy hardware: with USB or SPI, your raw thermal frames have to take a long, winding detour. Data gets pushed through an intermediary USB controller or bridge chip, travels down a cable, and hits the host operating system's software stack. That means the CPU is constantly getting interrupted to process USB packets, forcing your systems to swallow huge latency penalties, high CPU loads, and bulkier physical wire bundles.
A direct-to-bus MIPI setup changes all of that. It links the uncooled thermal sensor core directly to an onboard custom ASIC. From there, the data runs over a dedicated, noise-shielded MIPI CSI-2 ribbon cable straight into the physical Video Ingress Port of the Host System on Chip (SoC). Thanks to hardware DMA (Direct Memory Access), these incoming raw 14-bit (Y14) video matrices are dumped right into system memory without ever asking the main CPU cores for permission. The result? Sub-millisecond physical latency.
High-Bandwidth & Minimal Latency
The MIPI CSI-2 protocol runs over the MIPI D-PHY physical layer, utilizing high-speed differential signal pairs consisting of one dedicated clock lane and up to four data lanes. Even a basic, single-lane D-PHY v1.1 configuration gives you a cool 1.5 Gbps of raw physical bandwidth.
Compare that to SPI, which hits a wall around 50 MHz (effectively 50 Mbps). Sure, SPI can handle a tiny, low-res 160 x 120 thermal toy running at a sluggish 9 Hz. However, if you are working on a professional 640 x 512 resolution sensor spinning out 30 frames per second at a full 14-bit radiometric depth, you have some heavy math to deal with:
Data Rate = 640 × 512 × 30 frames/sec × 14 bits/pixel ≈ 137.6 Mbps
You cannot shove that down an SPI bus without major signal attenuation, clock skew, and timing errors. And trying to push that raw matrix over USB 2.0 wraps the video packets in complex protocol frames, spiking CPU usage to critical levels. MIPI CSI-2 keeps it simple by routing raw pixels directly, shedding protocol weight and dropping glass-to-memory latency down close to zero.
| Parameter / Metric | SPI Bus | USB 2.0 / USB-C | Parallel DVP | MIPI CSI-2 |
|---|---|---|---|---|
| Max Practical Bandwidth | ~50 Mbps | ~480 Mbps | ~800 Mbps | Up to 6.0 Gbps (4 lanes) |
| Protocol CPU Overhead | Extreme (Bit-banging/Interrupts) | High (USB Core Daemon & Drivers) | Medium (High pin toggle count) | Very Low (Direct hardware DMA) |
| Latency (Glass-to-GPU) | > 120 ms | 45 ms - 90 ms | 15 ms - 35 ms | < 5 ms |
| Physical Pin Count | 4 - 5 pins | 4 pins (VCC, GND, D+, D-) | 12 - 20 pins | 6 - 10 pins (Ultra-low EMI) |
| Max Transmission Distance | < 15 cm | Up to 3 meters | < 10 cm (Highly sensitive) | Up to 30 cm (Flexible PCB) |
| Multi-Camera Sync | Extremely difficult | Imprecise (Software sync) | Moderate | Precision Hardware Triggering |
In high-stakes, real-world fields like collision avoidance on autonomous unmanned aerial vehicles (UAVs), raw acquisition speed can literally be the difference between a successful mission and a total layout crash. When you use a MIPI interface, the SoC gets the status of the uncooled microbolometer sensor frame-by-frame with zero lag, giving your software algorithms the speed they need to spot obstacles and course-correct instantly.
2. Inside the Hardware: ASIC Processing & The Uncooled LWIR Microbolometer Signal Chain
Let's lift the metal shield and look at the silicon. A high-end thermal camera module MIPI setup is a precision electro-optical instrument. Its job is to take long-wave infrared radiation (ranging from 8 μm to 14 μm) and convert those photons into clean, serialized digital packets ready for your host CPU.
First, IR light passes through a professional Germanium (Ge) prime lens, like a 9mm fixed optic. Since normal glass blocks LWIR light, Germanium is the material of choice here. The lens focuses that thermal energy onto a Focal Plane Array (FPA) packed with uncooled Vanadium Oxide (VOx) or Silicon Diode microbolometers.
Each pixel in that array is a microscopic bridge structure suspended over the silicon. When an IR photon hits that bridge, the temperature of the membrane shifts, changing its electrical resistance. A Readout Integrated Circuit (ROIC) bonded right beneath the microbolometer array scans these shifts, applies bias currents, and converts those analog signals into high-resolution raw digital counts via on-chip Analog-to-Digital Converters (typically outputting 14-bit or 16-bit raw values).
The Vital Role of the Onboard ASIC
If you tried to feed raw microbolometer data directly into a host processor without cleaning it up first, your CPU would choke. Raw microbolometer data is incredibly messy: it is riddled with spatial non-uniformities, dead pixels, and thermal noise. That is why high-grade MIPI thermal cores use an onboard Application-Specific Integrated Circuit (ASIC) to handle the heavy lifting before the pixels ever hit the MIPI lines.
Here are the core hardware processing stages the ASIC runs in real-time:
⚙️ Non-Uniformity Correction (NUC): This step compensates for pixel-to-pixel drift. Over time, internal camera heat causes the pixels to report differently. The ASIC applies real-time gain and offset matrices, temporarily clicking an internal physical shutter to establish a zero-point baseline.
⚙️ Bad Pixel Replacement (BPR): When a microbolometer pixel dies or gets stuck, the ASIC interpolates surrounding pixel data to cover it up on the fly.
⚙️ Spatial and Temporal Filtering: This uses 3D adaptive noise reduction algorithms to drop the device's Noise Equivalent Temperature Difference (NETD), making the image crisp even in scenes where everything is roughly the same temperature.
⚙️ Automatic Gain Control (AGC) & Dynamic Range Compression (DRC): If you want human-readable video, you can't just display a raw 14-bit stream. The ASIC compresses that massive dynamic range into a high-contrast 8-bit output (using spatial contrast algorithms like CLAHE).
⚙️ Telemetry and Radiometric Metadata Insertion: The ASIC embeds calculated temperature values directly into the blanking lines of each video packet. This lets your code poll any single pixel's exact temperature estimation without having to parse a completely separate data stream.
Once processed, the ASIC packages this data into clean MIPI frames (often using 14-bit raw, UYVY, or RGB formats). The physical D-PHY transmitters serialize this data and push it across the high-speed differential lanes. Meanwhile, configuration commands, register tweaks, and commands travel back and forth over the Camera Control Interface (CCI)—which is really just a standard fast-mode I2C clock line running up to 400 kHz.
3. Embedded Integration: Step-by-Step Driver, Device Tree, & V4L2 Pipeline Setup
If you are working in the shop to hook up one of these modules to an embedded Board like the BCM2711/BCM2712 (found on Raspberry Pi 4/5) or an NVIDIA Jetson, you need to make sure your hardware pinouts, device tree, and V4L2 layers are all aligned.
1. Physical Pinout Mapping
In most setups, your sensor core connects to the host via a fine-pitch 15-pin or 22-pin Flexible Printed Circuit (FPC) ribbon cable. Make sure you map these lines exactly on your board:
⚙️ VCC (Power Rails): Usually requires distinct 3.3V, 1.8V, and sometimes 1.2V core power lines.
⚙️ GND: Crucial to wrap high-frequency shield grounds around the differential clock and data lines to kill crosstalk dead.
⚙️ MCLK (Master Clock): $24\text{ MHz} - 27\text{ MHz}$ signal supplied by the host to run the internal ASIC state machine.
⚙️ I2C SDA / SCL (CCI): Controls register reads and writes.
⚙️ MIPI CLKP / CLKN: Differential clock line pair.
⚙️ MIPI D0P/N & D1P/N: Two lanes of differential data pairs for transmission.
⚙️ PWDN / RESET: Standard GPIO pins for hard-cycling power and resetting the ASIC.
2. Device Tree Integration (DTSI Source File)
To let the Linux kernel know that there is a camera core listening on the physical CSI port, you have to write and compile a Device Tree Overlay (.dtbo). Here is a tested device tree file you can adapt to register an ASIC-run thermal core at I2C address 0x30:
/dts-v1/;
/plugin/;

/ {
    compatible = "brcm,bcm2711", "brcm,bcm2835";

    fragment@0 {
        target = <&i2c_csi_dsi>;
        __overlay__ {
            #address-cells = <1>;
            #size-cells = <0>;

            thermal_mipi: thermal_mipi@30 {
                compatible = "thermal-imaging,mipi-640";
                reg = <0x30>; /* I2C address of ASIC controller */
                status = "okay";

                clocks = <&cam1_clk>;
                clock-names = "xclk";

                pwdn-gpios = <&gpio 5 1>; /* Active Low */
                reset-gpios = <&gpio 6 1>; /* Active Low */

                port {
                    thermal_mipi_out: endpoint {
                        remote-endpoint = <&csi1_ep>;
                        clock-lanes = <0>;
                        data-lanes = <1 2>; /* Utilizes 2 MIPI Data lanes */
                        link-frequencies = /bits/ 64 <297000000>;
                    };
                };
            };
        };
    };

    fragment@1 {
        target = <&csi1>;
        __overlay__ {
            status = "okay";
            port {
                csi1_ep: endpoint {
                    remote-endpoint = <&thermal_mipi_out>;
                    data-lanes = <1 2>;
                };
            };
        };
    };
};
3. V4L2 Subsystem Verification & Pipeline Control
Once you compile that overlay and boot up your system, standard Linux drivers should pick up the MIPI camera and map it directly as a Video4Linux2 device. Let's run a quick terminal check to confirm the physical bus registered properly:
# Query the system to confirm driver attachment
v4l2-ctl --list-devices
Our console should output something clean like this, indicating the CSI hardware receiver parsed the overlay:
Unicam Video Capture (platform:fe801000.csi):
    /dev/video0
    /dev/video1
Now, let's query the specific device node to see what kind of pixel data configuration the onboard ASIC is sending over the MIPI interface:
# List supported resolutions and pixel-formats
v4l2-ctl -d /dev/video0 --list-formats-ext
You should see formats for both raw data and clean, processed video streams:
ioctl: VIDIOC_ENUM_FMT
    Index       : 0
    Type        : Video Capture
    Pixel Format: 'Y14 ' (Private Raw 14-bit)
    Size: 640x512
        Interval: 0.033 s (30.000 fps)

    Index       : 1
    Type        : Video Capture
    Pixel Format: 'UYVY' (YUV 4:2:2 8-bit)
    Size: 640x512
        Interval: 0.033 s (30.000 fps)
If you want to grab some raw frames and dump them directly to disk without loading any heavy decoding libraries, run this terminal test command:
# Capture raw radiometric Y14 frames directly from the MIPI module
v4l2-ctl --device=/dev/video0 --set-fmt-video=width=640,height=512,pixelformat=Y14 --stream-mmap --stream-count=150 --stream-to=test_frames.raw
4. Python-Based Real-Time Capture and Radiometric Conversion Engine
To pull this stream into a real computer-vision pipeline, you can write a lightweight Python wrapper using OpenCV. This code will hook the frame stream, read the raw pixel counts, convert them to actual surface temperatures, and display a localized thermal layout:
import cv2
import numpy as np

class MIPIThermalCapture:
    def __init__(self, device_id=0, width=640, height=512):
        self.device_id = device_id
        self.width = width
        self.height = height

        # Open video device using V4L2 capture backend
        self.cap = cv2.VideoCapture(self.device_id, cv2.CAP_V4L2)
        if not self.cap.isOpened():
            raise RuntimeError(f"Failed to access thermal camera at /dev/video{device_id}")

        # Select the Raw Y14 format (this maps to raw pixel counts)
        self.cap.set(cv2.CAP_PROP_FOURCC, cv2.VideoWriter_fourcc(*'Y','1','4'))
        self.cap.set(cv2.CAP_PROP_FRAME_WIDTH, self.width)
        self.cap.set(cv2.CAP_PROP_FRAME_HEIGHT, self.height)

    def read_pixel_and_temperature_matrix(self):
        ret, frame = self.cap.read()
        if not ret:
            return False, None, None

        # Treat frame as raw uint16 array (since data is Y14 / raw-14 bit)
        raw_16bit = np.frombuffer(frame, dtype=np.uint16).reshape((self.height, self.width))

        # Convert raw digital counts (ADU) to physical temperature in Celsius
        # Assumes calibration scale: Temp in Celsius = (ADU * 0.04) - 273.15
        temperature_map = (raw_16bit.astype(np.float32) * 0.04) - 273.15

        # Map 14-bit range to 8-bit for display visualization
        normalized_8bit = cv2.normalize(raw_16bit, None, 0, 255, cv2.NORM_MINMAX, dtype=cv2.CV_8U)
        colored_frame = cv2.applyColorMap(normalized_8bit, cv2.COLORMAP_JET)

        return True, colored_frame, temperature_map

    def release(self):
        self.cap.release()

if __name__ == "__main__":
    thermal = MIPIThermalCapture(device_id=0)
    try:
        print("[INFO] Initializing raw MIPI feed. Press 'q' to exit.")
        while True:
            success, display_img, temp_data = thermal.read_pixel_and_temperature_matrix()
            if not success:
                break

            # Query point temperature in the center of the frame (Coordinates x=320, y=256)
            center_temp = temp_data[256, 320]
            cv2.putText(display_img, f"Center Spot: {center_temp:.2f} C", (30, 40),
                        cv2.FONT_HERSHEY_SIMPLEX, 1, (255, 255, 255), 2)

            cv2.imshow("MIPI Thermal Real-Time Capture", display_img)
            if cv2.waitKey(1) & 0xFF == ord('q'):
                break
    finally:
        thermal.release()
        cv2.destroyAllWindows()
4. Industrial Product Showcases: Technical Specification Comparison
When you are sourcing uncooled infrared sensors for a real product deployment, you have to weigh mechanical specs and interface types against your payload's size, weight, and power (SWaP) limits. Let's look at two commercial-grade, ultra-compact thermal cores designed to handle these integration challenges in the field.
Product Showcase 1: Mini2 640x512 9mm Thermal Imaging Camera Module For Drones
The Mini2 is an ultra-light, compact thermal core designed to slide onto micro-gimbals, commercial drone frames, and space-critical robotic limbs.

Technical Overview:
The Uncooled Infrared Mini2 640x512 9mm Thermal Imaging Camera Module For Drones is built from the ground up for weight-critical aerial payloads. By pairing a highly sensitive, uncooled VOx microbolometer array with a precision-milled 9mm lens, this module serves up incredibly sharp, long-range thermal imagery. Because it drops raw radiometric measurements and filtered frames straight out of its on-board MIPI CSI-2 interface, you bypass bulky, power-hungry USB converters. That translates to longer flight times, fewer payload stabilization issues, and clean tracking metrics on target.
View Product Details & Pricing ➔
Product Showcase 2: ASIC Thermal Sensor Camera Module
This module pairs an industrial-grade uncooled core with a highly versatile interface board, making it perfect for fixed security systems, network monitoring, and plant safety arrays.
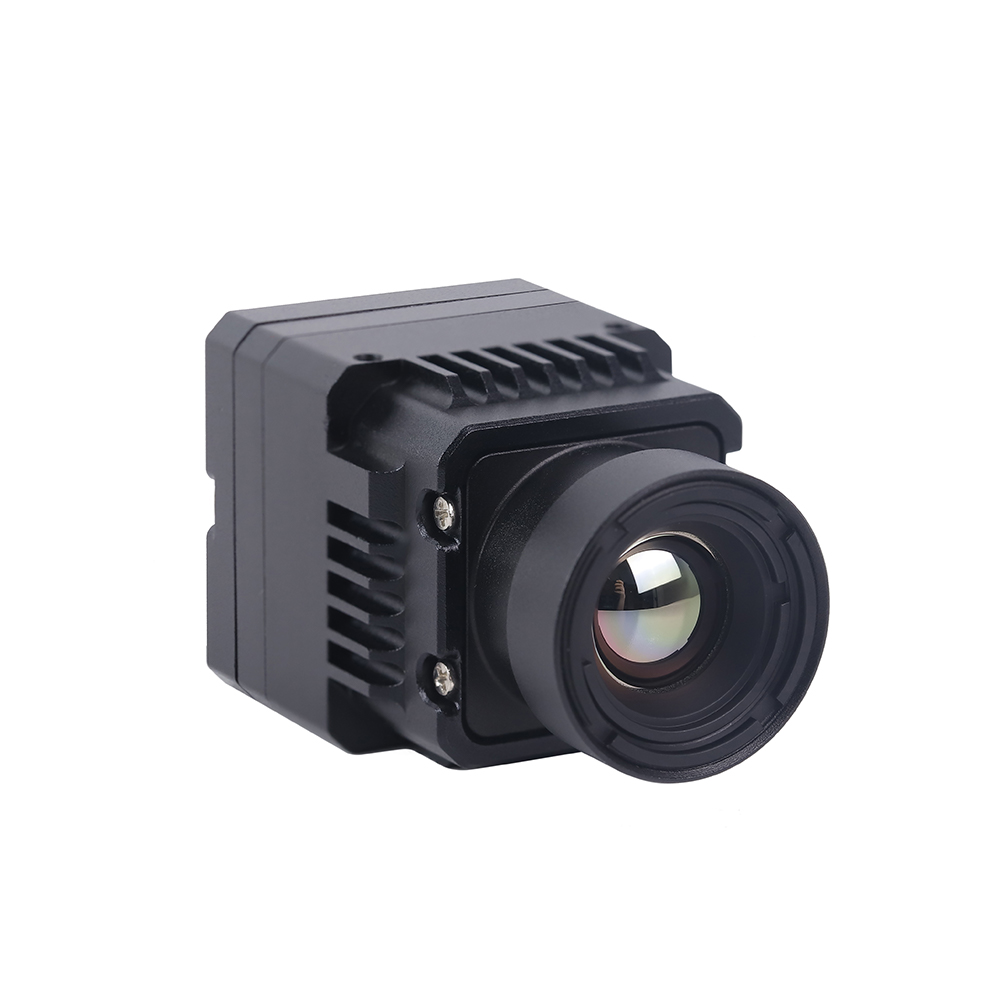
Technical Overview:
The Uncooled Infrared RJ45 CVBS RTSP IP 640*512 Thermal Sensor Camera Module is built around a heavy-duty ASIC processing core to run continuously in demanding environments. This module stands out because it packs native networking hardware. You get RJ45 capabilities to stream video directly over RTSP/RTMP, combined with CVBS analog video lines to hook up directly to legacy security monitors. If you are building a larger industrial monitoring system or a facility fire-watch net, this multi-port flexibility saves you from having to daisy-chain external system controllers.
View Product Details & Pricing ➔
Comparative Specifications Matrix
Let's map these two cores side-by-side so you can see how their hardware profiles line up with your design targets:
| Technical Parameter | Mini2 640x512 Uncooled Module | ASIC Thermal Sensor Module (RJ45/CVBS/RTSP) |
|---|---|---|
| Microbolometer Type | Uncooled Vanadium Oxide (VOx) Focal Plane Array | Uncooled VOx Core with Onboard Industrial ASIC |
| Pixel Resolution | 640 × 512 (384 × 288 options available) | 640 × 512 Native High-Resolution |
| Pixel Pitch | 12 μm | 12 μm |
| Spectral Range | 8 μm - 14 μm (LWIR Bandwidth) | 8 μm - 14 μm (LWIR Bandwidth) |
| Thermal Sensitivity (NETD) | < 40 mK (at 25°C, f/1.0 rating) | < 50 mK (at 25°C, f/1.0 rating) |
| Default Optics | 9mm fixed Germanium prime lens | Multiple configurations (9mm, 13mm, or custom) |
| Frame Processing Speed | 25 Hz / 30 Hz real-time output | 30 Hz / 50 Hz high-frequency configuration |
| Output Data Interface | MIPI CSI-2 (Raw & Video Streams) | RJ45 Ethernet (IP/RTSP), Analog CVBS |
| Hardware Voltage Control | 3.3V - 5.0V Input Rails | 5.0V - 12.0V Regulator Rails |
| Weight Profile | < 18 grams (Ultra-light design) | ~ 45 grams (With multi-port interface board) |
| Primary Field Deployments | UAV gimbals, robotic systems, aerial mapping | Fixed security arrays, industrial diagnostic stations |
5. Edge AI and Aerial Systems Deployment Archetypes
Taking a raw, uncooled MIPI core and sticking it on an active, autonomous drone frame introduces physical and electrical challenges. To avoid field failures, you must keep these key physical factors in mind:
Electromagnetic Shielding (EMI Protection)
Drones are packed with noisy electronics. Modern multi-rotor speed controllers (ESCs), telemetry lines running on 915 MHz, and digital video transmitters throw out a lot of high-frequency noise. Standard camera ribbon cables act like antennas, catching this interference and dropping packets, causes frame freezes or physical bus lockups.
To avoid this, wrap your physical flex lines with copper or aluminum shielding tapes, and make sure to ground that shield directly to your drone's central carbon frame. This channels noise away from sensitive high-speed lines, keeping your signal clean.
Low-Noise Power Distribution
When your drone hits the throttle, the battery drops voltage or spikes. Uncooled microbolometers are highly sensitive to power input fluctuations. If your power line is noisy, you'll see horizontal banding across your thermal video.
To prevent this, use a dedicated, high-PSRR (Power Supply Rejection Ratio) low-dropout linear regulator (LDO) to feed the thermal core. This decouples the sensor's analog inputs from battery drops and motor-switching noise.
Mechanical Vibration Isolation
UAV motors and props create high-frequency micro-vibrations. These vibrations cause physical distortion and motion blur in thermal images, and can put stress on physical flex cable connections over time.
To fix this, utilize soft elastomer damping balls (aim for a 30A to 40A shore hardness rating) on your sensor mounts. This keeps the camera isolated and protects your 12-micron spatial resolution from getting smeared during high-speed flights.
Designing the Real-Time AI Inference Pipeline
Using a direct MIPI interface with a powerful companion processor (like the Jetson Orin Nano) allows you to run modern object detection models like YOLOv8 on the fly. This workflow is highly effective for search and rescue operations, structural checks, or automated security patrols.
Since MIPI bypasses clunky USB conversion layers, raw frames stream into memory with almost zero delay. Below is an integration-ready Python wrapper using NVIDIA's TensorRT execution engine to run high-speed inference on raw thermal frames:
import sys
import time
import numpy as np
import tensorrt as trt
import pycuda.driver as cuda
import pycuda.autoinit
import cv2

# TensorRT Inference Wrapper for Edge SoC platforms
class HighSpeedThermalYOLO:
    def __init__(self, engine_path):
        self.logger = trt.Logger(trt.Logger.WARNING)
        with open(engine_path, "rb") as f, trt.Runtime(self.logger) as runtime:
            self.engine = runtime.deserialize_cuda_engine(f.read())
        self.context = self.engine.create_execution_context()

        # Allocate Host and Device buffers
        self.inputs, self.outputs, self.bindings, self.stream = self.allocate_buffers()

    def allocate_buffers(self):
        inputs = []
        outputs = []
        bindings = []
        stream = cuda.Stream()
        for binding in self.engine:
            size = trt.volume(self.engine.get_binding_shape(binding)) * 1
            dtype = trt.nptype(self.engine.get_binding_dtype(binding))
            # Allocate Host Pin page-locked memory
            host_mem = cuda.pagelocked_empty(size, dtype)
            # Allocate Device GPU Memory
            device_mem = cuda.mem_alloc(host_mem.nbytes)
            bindings.append(int(device_mem))
            if self.engine.binding_is_input(binding):
                inputs.append({'host': host_mem, 'device': device_mem})
            else:
                outputs.append({'host': host_mem, 'device': device_mem})
        return inputs, outputs, bindings, stream

    def run_inference(self, frame_input):
        # Resize raw image and normalize values to 0.0 - 1.0 range
        resized = cv2.resize(frame_input, (640, 512))
        normalized = resized.astype(np.float32) / 255.0

        # Flatten image array and copy to driver host memory
        self.inputs[0]['host'] = np.ascontiguousarray(normalized)

        # Copy input data to GPU device memory
        cuda.memcpy_htod_async(self.inputs[0]['device'], self.inputs[0]['host'], self.stream)
        # Execute model asynchronously
        self.context.execute_async_v2(bindings=self.bindings, stream_handle=self.stream.handle)
        # Copy output back to Host memory
        cuda.memcpy_dtoh_async(self.outputs[0]['host'], self.outputs[0]['device'], self.stream)

        self.stream.synchronize()
        return self.outputs[0]['host']

if __name__ == "__main__":
    print("[INIT] Loading TensorRT Deep Inference Network...")
    # thermal_detector = HighSpeedThermalYOLO("models/yolov8s_thermal.engine")
    print("[OK] Execution engine loaded. Ready to receive high-speed thermal frames from MIPI kernel.")
6. Deep-Dive Developer FAQs (Technical Troubleshooting)
Why is it so difficult to find a reliable MIPI CSI-2 thermal camera module with driver support for Raspberry Pi or Jetson?
Most older microbolometer chips don't even have MIPI transmitters; they output over SPI or high-pin-count parallel connections. To make them work over MIPI, manufacturers have to add a custom serializer or bridge chip right behind the sensor core.
Because these hardware designs are proprietary, standard Linux builds do not include native kernel drivers for them. To get your camera running on a Raspberry Pi or Jetson, the manufacturer must write custom kernel drivers and Device Tree Overlays (DTOs) that configure the clock speeds, lane settings, and I2C commands for the internal ASIC. The modules featured in this guide simplify this by handling the non-uniformity correction and bad-pixel mapping in mechanical hardware, allowing the core to output standard formats (like raw Y14 or UYVY) over the MIPI connection.
Can I get real-time, high-resolution thermal video streaming over MIPI for drone or robotics applications?
Let's check the numbers: a 640 x 512 array running at 30 Hz translates to about 9.8 million pixels per second. While SPI cannot support this bandwidth, MIPI CSI-2 handles it easily, and can even stream raw 14-bit radiometric datasets alongside 8-bit AGC spatial video to help your computer vision models run faster.
This direct streaming capability is highly beneficial for drones. Cutting out conversion latency ensures your autopilot systems can react instantly during fast, low-altitude flights. Plus, MIPI's low-voltage differential signaling (LVDS) lowers power consumption and cuts down on electro-magnetic interference (EMI), which protects the drone's sensitive GPS, telemetry, and RC receivers.
Do these MIPI thermal modules support full radiometric temperature measurement for DIY thermal scopes or industrial inspection?
Standard integration pipelines handle this data in one of two configurations:
1. Dual Format Streaming (Two V4L2 Nodes): The hardware driver registers two virtual devices simultaneously. One device (/dev/video0) streams processed 8-bit visual images (like grayscale or color-mapped ironbow profiles for display). The secondary device (/dev/video1) streams raw 14-bit data containing linear digital counts (ADU) associated with true microbolometer energy readings.
2. Metadata Overlay Packaging: The uncooled core outputs a single high-resolution stream where the raw 14-bit data sits in the core frame payload, and calculated real-world Kelvin/Celsius metadata is appended to the beginning or end of each frame packet.
To convert raw pixel values into real-world temperatures, the host system performs a basic linear translation:
T_Celsius = (Pixel Count × Resolution) - Offset
For instance, using a typical resolution scale where 1 LSB = 0.04 K, a raw pixel value of 9300 converts to:
T = (9300 × 0.04) - 273.15 = 98.85°C
This high precision, which is accessible directly over python-based opencv captures, enables DIY thermal scopes and automated factory diagnostics to run real-world operations such as real-time tracking, thermal profiling of PCB components, and automated fire alarms.
How do I handle hardware returns, defective sensor repairs, or module exchanges during project scaling?
Our structured, trace-logged Refunds and Returns Policy details the steps for returning a module for evaluation or initiating system exchanges to keep your projects on schedule. Every returned module is analyzed to assess component health, diagnostic alignment, and FPA calibration status, ensuring that replacements meet factory performance standards.
📚 References & Further Reading
- Industry Standard: Wikipedia Thermal Imaging (Thermography Fundamentals)
- Hardware Component Partner: JM Chip Processing Technology
- Integration Guide: Best MIPI Thermal Camera Module for Raspberry Pi & Drone Integration
- Sensor Guide: Mini 640 Uncooled LWIR Thermal Module Integration Blueprint
- Policy Document: Thermal-Image Refunds and Returns Operations Guide